vendredi 27 mars 2020

So Very Happy Layout


Hi friends!

I have a new layout to share with you today. I used the Maggie Holmes Heritage collection to document a sweet photo of my youngest girl and her dad wandering in the forest a few years back. I really enjoyed making this page and I hope you'll like it too!

Bonjour!

J'ai une toute nouvelle page à partager avec vous aujourd'hui. J'ai utilisé la collection Heritage de Maggie Holmes avec une jolie photo de ma petite dernière et de son papa pendant une promenade en forêt il y a quelques années. J'ai beaucoup aimé faire cette page et j'espère qu'elle vous plaira!


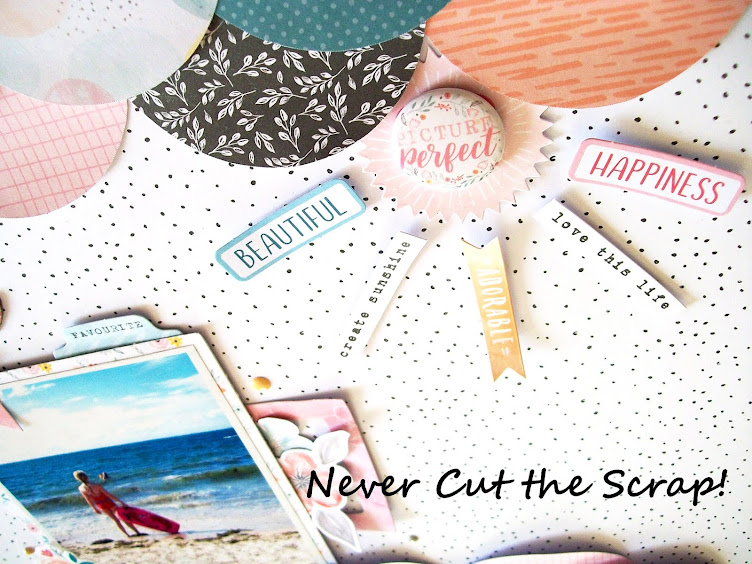
I picked the pretty Margaret paper for my background and decided to create a sun inside the frame. I cut my 5X7" photo in a half circle and backed it with a 6x8 floral paper that I cut in a bigger half circle. I then placed the picture along the right side of the frame with foam tape to make it pop.

J'ai choisi le papier Margaret pour le fond et j'ai décidé de créer un soleil à l'intérieur du cadre. J'ai découpé ma photo de format 13x18 cm en demi-cercle et je l'ai mattée avec un papier floral du paper pad que j'ai également découpé en demi-cercle. J'ai ensuite collé la photo le long du cadre à droite de la page avec de la mousse 3D pour la faire ressortir.


I wanted to use layered hearts to make the sunbeams and got busy drawing and cutting hearts in several 6x8 papers. I arranged them in rays around the photo and folded them up before adhering them to add depth to my page.

Pour les rayons, je suis partie sur l'idée de cœurs superposés et je me suis affairée à les tracer et à les découper dans plusieurs feuilles du paper pad. Je les ai disposés en rayons autour de la photo et je les ai pliés avant de les coller au niveau du pli pour apporter du relief à ma page.


Time to start embellishing! I adorned the picture with cardstock and puffy stickers and used a cute banner for the title. I also placed clear word stickers from the Heritage sticker book around the photo. I topped my sunbeams with more stickers and I finished my layout by adding a couple of pretty butterflies on the background and some puffy stickers on the frame.

Une fois mon soleil terminé, je suis passée à la partie embellissement. J'ai orné la photo d'autocollants de la collection et j'ai utilisé une bannière pour le titre. J'ai disposé des mots autocollants transparents autour de la photo et j'ai décoré mes rayons de soleil avec d'autres autocollants. Enfin, j'ai terminé ma page en ajoutant deux jolis papillons sur le papier de fond ainsi que quelques puffy stickers noirs sur le cadre. 


Thank you so much for stopping by today! Take care!

Merci beaucoup de votre visite et prenez bien soin de vous!


Elodie


jeudi 19 mars 2020

Willow Lane Cards


Hi everyone!

I'm stopping by today to share a set of cute cards I made with the Willow Lane collection by Maggie Holmes and Crate Paper. I just can't get enough of this collection! It's so sweet and pretty.

Bonjour à tous!

Je suis de passage aujourd'hui pour partager des cartes toutes mignonnes que j'ai faites avec la collection Willow Lane de Maggie Holmes et Crate Paper. Je ne me lasse pas de cette collection que je trouve belle comme tout!


I decided to go with square cards and started by cutting two 10x20 cm strips in patterned papers from the 6x8 paper pad. I then folded the strips in half to get two 10x10 cm cards.

Je suis partie sur l'idée de cartes carrées et j'ai commencé par couper deux bandes de dimension 10x20 cm dans des feuilles du paper pad. J'ai ensuite plié mes bandes en deux pour obtenir deux cartes de dimension 10x10 cm.


Next I topped my cards with a square of patterned paper in coordinating colors and turned to the embellishing part. As my cards are small, I kept it simple and juxtaposed cute Willow Lane stickers on the top of the cards.

J'ai surmonté mes cartes d'un carré de papier à motif de couleur coordonnée et je suis passée à la partie embellissement. Comme mes cartes sont petites, je suis restée simple et j'ai juxtaposé de jolis autocollants de la collection sur le dessus des cartes.


I adhered the cardstock stickers with foam squares to add even more dimension to my cards. I used banner stickers for the sentiment and put the finishing touch with a few enamel dots from my stash.

J'ai collé les autocollants en cardstock avec des carrés de mousse 3D pour apporter encore plus de relief à mes cartes. J'ai utilisé des bannières autocollantes pour le titre et j'ai apporté la touche finale avec quelques enamel dots.


I hope you are inspired to create cute square cards. Thank you so much for joining me today! Sending good vibes your way!

J'espère que je vous ai donné envie de faire de jolies cartes carrées. Merci de vous être joints à moi aujourd'hui! Je vous envoie plein d'ondes positives et vous dis à bientôt!


Elodie


jeudi 12 mars 2020

Us Layout


Hello there!

I hope your week is going well! I'm already back with a new layout featuring the Midnight collection by Cocoa Vanilla Studio, beautiful fussy cut flowers and a selfie snapped by my oldest girl.

Bonjour!

J'espère que vous passez une bonne semaine! Je suis déjà de retour avec une nouvelle page où figurent la collection Midnight de Cocoa Vanilla Studio, de belles fleurs en papier et un selfie pris par ma fille aînée.


To make this page, I played with my craft scissors and I fussy cut flowers in the gorgeous Bloom & Grow paper. I then adhered them on the edges of the Shine Bright paper, only applying glue on the borders to make the flowers pop and bring dimension to the page.

Pour réaliser cette page, j'ai joué avec mes ciseaux de précision en découpant des fleurs dans le superbe papier Bloom & Grow. Je les ai ensuite disposées sur les bords du papier Shine Bright en appliquant de la colle uniquement sur un bord des fleurs pour les faire ressortir et apporter du relief à la page.


I backed the picture with a piece of the Mixed Blessing paper and I adhered it in the center of my layout with foam squares. I then turned to the embellishing part and created a cluster around the photo with die cuts and cardstock stickers.

J'ai matté la photo avec un morceau de la feuille Mixed Blessing et je l'ai collée au centre de la page avec des carrés de mousse 3D. Je suis ensuite passée à la partie embellissement et j'ai créé un cluster autour de ma photo avec des die-cuts et des autocollants en cardstock.


For the title, I used a die cut from the cardstock titles pack and I placed it at the bottom of the photo, along with cute hearts. I embellished the background with more heart stickers and I added a die cut that I topped with a chipboard banner on the bottom right corner of the page. I finished my layout by layering two pennants from the ephemera pack at the top of the page.

Pour le titre, j'ai utilisé une découpe du paquet de cardstock titles et je l'ai placée sous la photo avec des cœurs. J'ai orné le fond d'autres cœurs autocollants et j'ai ajouté un die-cut que j'ai surmonté d'une bannière en chipboard dans le coin inférieur droit de la page. J'ai apporté la touche finale avec deux fanions de l'ephemera pack que j'ai superposés en haut de la page.


Thanks so much for stopping by today! I hope you are inspired to use fussy cut flowers on your next layout.

Merci de vous être arrêtés par ici aujourd'hui! J'espère que cette page vous donnera envie d'utiliser des fleurs sur votre prochain projet.


Elodie


jeudi 5 mars 2020

Be A Light Layout


Hi friends!

I haven't been around in a long while but I'm finally back with a new layout to share with you. Yay! I used the Truly Grateful collection by Paige Evans and Pink Paislee and combined it with a sweet photo of my youngest girl. It feels good to scrap again!

Bonjour à tous!

Ça faisait longtemps que je n'étais pas passée par ici mais je suis enfin de retour avec une nouvelle page à partager avec vous. J'ai utilisé la collection Truly Grateful de Paige Evans et Pink Paislee que j'ai associée à un joli portrait de ma petite dernière. Ça fait du bien de se remettre au scrap!


I started my layout by looking for a background paper and went with Paper 18 and its pretty pink ombre pattern to echo the colors on my photo. The idea I had in mind was to make half a heart on my page using Truly Grateful embellies. So I got busy arranging die cuts, flowers, leaves and puffy stickers in a heart shape on the right side of the page.

J'ai commencé par chercher un papier de fond en accord avec les couleurs de ma photo et je me suis arrêtée sur le papier 18 et son joli dégradé rose. J'avais pour idée de faire un demi-cœur sur ma page à l'aide d'embellissements de la collection. Je me suis donc affairée à disposer des découpes, des fleurs, des feuilles et des autocollants Truly Grateful de manière à former la moitié d'un cœur à droite de la page.


I backed the picture with a pretty purple paper from the 6x8 paper pad and I placed it on the right border of my layout. I then adorned it with cute puffy hearts and a couple of ephemera pieces. Finally I completed my page by adding wood buttons and puffy dots all around the heart.

J'ai matté la photo avec un joli papier mauve du paper pad et je l'ai placée tout à droite de la page. Je l'ai ensuite ornée de cœurs autocollants et de découpes de l'ephemera pack. Enfin, j'ai terminé ma page en ajoutant des boutons en bois et quelques autocollants supplémentaires autour du demi-cœur.


I'm so happy to be back here with you and I hope to stop by again very soon with more projects to share. Thanks so much for joining me today! Have a lovely day!

Je suis super contente d'être de retour par ici et j'espère revenir très vite avec de nouveaux projets à partager. Merci de vous être joints à moi et bonne journée!


Elodie