lundi 6 août 2018

Love You To The Moon - Pink Paislee


Bonjour à tous!

J'espère que vous avez passé un bon weekend! Je commence cette nouvelle semaine avec une page que vous pouvez retrouver aujourd'hui sur le blog de Pink Paislee. J'ai associé la jolie collection Wild Child avec une photo de ma petite dernière endormie dans la voiture alors qu'elle était bébé.

Hi friends!

I hope you had a great weekend! I'm starting off this new week with a layout that is up today on the Pink Paislee blog. I made a sweet page using the awesome Wild Child collection and a photo of my youngest daughter sleeping in the car back when she was a baby. So cute!


Pour réaliser cette page, j'ai mélangé les deux collections Wild Child. Elles vont vraiment bien ensemble! J'ai commencé par chercher un papier de fond et j'ai choisi le beau papier 09 de la collection masculine. J'aime beaucoup ce joli ciel étoilé. Juste ce qu'il me fallait pour ma photo! Pour aller avec cette photo de ma belle au bois dormant, je suis partie sur un design en couronne et j'ai décidé de coudre une lune sur la page avec du fil blanc et bleu foncé.

To make this layout, I mixed the two Wild Child lines. They really go great together! I started by looking for a background paper and chose the dreamy Paper 09 from the boy line. I love that fun and pretty night sky. Just what I needed for my photo! To go with this cute picture of my sleeping beauty, I went with a wreath design and decided to stitch a big moon on the page using white and dark blue thread.


J'ai matté la photo avec un papier du paper pad Wild Child Girl et je l'ai collée avec de la mousse 3D au centre de la lune. J'ai glissé un onglet avec la date sous la photo et je l'ai ornée de die-cuts et d'un puffy sticker de la collection féminine.

I matted the photo with a paper from the Wild Child Girl 6x6 paper pad and I adhered it on my hand stitched moon with foam tape. I tucked a tab with the date under the picture and adorned it with die cuts and a puffy sticker from the girl line.


J'ai ensuite rempli la lune avec des die-cuts ainsi qu'avec des autocollants des deux collections. Pour le titre, j'ai utilisé des autocollants en chipboard de la collection masculine, je les ai placés sur le cercle que j'ai cousu et j'ai surmonté l'une des lettres avec un cœur autocollant.

Next I filled my hand stitched moon with die cuts as well as cardstock and puffy stickers from the two lines. For the title, I used chipboard stickers from the boy collection, placed them on the stitched circle and topped one of them with a cute puffy heart.


J'ai également ajouté des étoiles de la planche de rub-ons ainsi que des étoiles autocollantes en haut et en bas de la page et j'ai terminé avec quelques gouttes d'encre dorée pour apporter une touche scintillante.

I also added star rub-ons and stickers at the top and at the bottom of the page and I finished with droplets of gold ink to add a bit of shine to my sweet layout.


Merci d'être passé par ici! J'espère que cette page vous donnera envie d'associer les deux jolies collections Wild Child!

Thank you for stopping by today! I hope this page inspires you to mix and match the pretty Wild Child lines!


Elodie


vendredi 3 août 2018

All Good Things Are Wild & Free - Cocoa Vanilla Studio


Bonjour!

Je suis de passage pour partager une nouveau projet que vous pouvez retrouver aujourd'hui sur le blog de Cocoa Vanilla Studio. J'ai fait une page douce et féminine avec la très jolie collection Bohemian Dream ainsi qu'une grande photo de ma fille aînée se promenant sur Pebble Beach en Californie il y a quelques années.

Hi!

I'm sharing a brand new project on the Cocoa Vanilla Studio blog today. I made a dreamy and girly page using the super pretty Bohemian Dream collection and a large photo of my oldest daughter wandering on Pebble Beach during a trip around California a few years back.


Pour cette page, j'ai utilisé ma couleur préférée avec des papiers et des embellissements roses. J'ai commencé par chercher un papier de fond et j'ai finalement choisi le beau papier Dreamer.

I went with my favorite color for this layout and used pink papers and embellies. I started by looking for a background paper and picked the Dreamer sheet. How pretty is that ombre pattern?


J'ai ensuite coupé ma photo en deux et j'ai cousu les bords avec du fil rose pour apporter plus de détails et de texture à la page. J'ai ensuite collé la partie supérieure de la photo en haut de la page et la partie inférieure en bas. J'aime la façon dont la photo ressort sur le fond rose!

Next I cut the picture in half and I hand stitched the edges with pink thread to add detail and texture to my layout. I then adhered th upper part of the photo at the top of the page and the lower part right at the bottom. I like how the photo stands out against the pink background!


Je me suis ensuite affairée à embellir ma page. J'ai passé en revue la collection à la recherche d'embellissements roses et je les ai placés entre les deux parties de la photo. J'ai utilisé des die-cuts, des découpes en calque, des autocollants en chipboard et en cardstock, un badge ainsi que des cercles que j'ai découpés dans quelques feuilles du paper pad.

Time to start embellishing! I went through my Bohemian Dream stash looking for pink embellies and I arranged them between the top part and the bottom part of the photo. I used die cuts, vellum accents, cardstock and chipboard stickers, a flair button as well as circles that I cut in the 6x6 paper pad.


J'ai également surmonté certains cercles de mots autocollants et j'ai ajouté quelques enamel shapes roses ici et là. Pour le titre, j'ai utilisé une bande que j'ai coupée dans la feuille Boho Bits et je l'ai collée avec de la mousse 3D sur la partie inférieure de la photo.

I also topped a couple of patterned paper circles with word stickers from the accessory sticker sheet and I added a few pink enamel dots and hearts here and there. For the title, I used a strip that I cut in the Boho Bits cut apart sheet and I placed it on the lower part of the picture.


Pour terminer ma page, j'ai orné la photo de quelques bandes de journaling et d'un joli mot en chipboard de la collection.

To finish off my page, I adorned the photo with a couple of journaling strips and a pretty chipboard word.


Merci de vous être arrêté par ici! J'espère que cette page vous donnera envie d'utiliser de grandes photos sur vos pages et de vous amuser avec la collection Bohemian Dream!

Thanks so much for stopping by today! I hope you are inspired to use large photos on your layouts and play with the beautiful Bohemian Dream collection!


Elodie


mercredi 25 juillet 2018

Thankful - Pink Paislee


Bonjour!

Vous pouvez me retrouver aujourd'hui sur le blog de Pink Paislee avec un tout nouveau projet. J'ai utilisé la belle collection Auburn Lane et j'ai fait une page toute douce et féminine avec une photo des filles dans le jardin au printemps dernier ainsi que quelques éléments que j'aime beaucoup: du rose, des fleurs et des points de couture.

Hello there!

I'm sharing a brand new project on the Pink Paislee blog today. I played with the beautiful Auburn Lane collection and made a feminine page using a photo of my girls in the garden last spring and some of my scrappy favorites: pink, flowers, and hand stitching.


J'ai commencé par passer en revue les papiers de la collection à la recherche d'un fond et je me suis finalement arrêtée sur du rose avec les papiers 1 et 9. J'ai coupé une bande dans le papier 9 et je l'ai placée à gauche du papier 1.

I started by going through my Auburn Lane supplies to choose my background and settled on pink with the pretty Papers 1 and 9. I cut a strip in Paper 9 and placed it on the left side of Paper 1.


J'ai ensuite cousu un cadre tout autour du papier 1. J'ai tracé le cadre avec un crayon à papier, percé des trous avec une aiguille en suivant les traits de crayon que j'ai ensuite effacés et je l'ai cousu avec du fil blanc et quelques sequins du mixed embellishment pack. J'aime la douceur que ce cadre apporte à la page!

Next I got busy stitching a frame on Paper 1. First I drew a frame with a pencil, pierced holes with a pin following the pencil lines, erased them, and hand stitched it using white thread and a few sequins from the mixed embellishment pack. I like how soft and delicate this stitched frame looks!


Je suis ensuite passée au côté gauche de la page. J'ai découpé des triangles dans le papier 7 et je les ai placés au bord de la bande de papier floral. J'ai matté la photo avec un papier rose du paper pad et je l'ai collée sur mes triangles avec de la mousse 3D pour la faire ressortir.

Then I moved on to my photo cluster on the left side of the page. I fussy cut triangles from Paper 7 and placed them all along the edge of the floral paper strip. I matted the photo with a pink paper from the 6x8 paper pad and adhered it over my fussy cut triangles with foam tape to make it pop from the background.


Je me suis ensuite tournée vers la partie embellissement. J'ai orné la photo de jolies fleurs, de fanions du sticker book et d'un die-cut pour le titre. J'ai également glissé un cadre et un onglet de l'ephemera pack sous la photo et j'ai surmonté quelques embellissements de cœurs autocollants. Enfin, j'ai ajouté de belles fleurs découpées dans le papier calque de la collection sous la photo et le long du cadre.

Time to start embellishing! I topped my photo with pretty flowers from the floral embellishment pack, banners from the sticker book, and another die cut for the title. I also tucked a frame and a tab from the ephemera pack under the picture and adorned a couple of embellies with cute heart stickers. Last but not least, I added gorgeous fussy cut flowers from the specialty vellum paper under the photo and along the frame.


J'espère que ma page vous donnera envie de jouer avec vos ciseaux et avec cette magnifique collection! Merci de votre visite et à bientôt!

Thank you for joining me today! I hope you are inspired to play with your craft scissors and with the gorgeous Auburn Lane collection!


Elodie


mardi 17 juillet 2018

Happy Heart - Cocoa Vanilla Studio


Bonjour!

Vous pouvez me retrouver aujourd'hui sur le blog de Cocoa Vanilla Studio avec un tout nouveau projet. J'ai fait une page consacrée à ma petite dernière avec la très belle collection More than Words et je me suis amusée avec ses embellissements et quelques-uns de ses tampons.

Hello there!

I'm sharing a brand new project on the Cocoa Vanilla Studio blog today. I had fun with the More than Words stamps and embellies and made a girly page all about my youngest daughter.


Pour cette page, je suis partie sur un design simple et j'ai décidé de placer la photo ainsi que de jolis embellissements de la collection au centre de la page. J'ai commencé par chercher un papier de fond et j'ai finalement opté pour le verso de la feuille Noteworthy. Ce rose clair s'accorde parfaitement avec ma photo d'été et la fait bien ressortir!

For this layout, I went with a simple design and decided to arrange the photo, along with pretty More than Words embellies, in the center of the page. I started by looking for a background paper and picked the reverse side of the Noteworthy sheet. This light pink goes great with my bright summer photo!


Les tampons de la collection sont magnifiques et il fallait vraiment que je les utilise sur cette page. J'ai donc  tamponné de jolies fleurs en haut et en bas de la page avec de l'encre noire.

Have you been using the More than Words clear stamps? They are gorgeous, right?! I just had to use them on this layout and stamped pretty flowers at the top and at the bottom of the page with black ink.


J'ai collé la photo au centre de la page avec de la mousse 3D et je suis ensuite passée à la partie embellissement. J'ai orné la photo avec des autocollants et une fleur en calque. J'ai également glissé un cadre de l'ephemera pack sous la photo ainsi que quelques fleurs. Pour le titre, j'ai superposé deux mots en chipboard sous la photo. J'aime beaucoup comment ils ressortent sur le fond clair!

I adhered the photo in the center of the page with foam tape and then got busy embellishing. I adorned the picture with stickers from the accessory sticker sheet and with a vellum flower. I also tucked a pink frame from the ephemera pack and more flowers under it. For my title, I layered two chipboard words under the photo. I like how those black words pop off the page!


J'ai ensuite ajouté des embellissements de la collection au dessus et sous la photo. J'ai utilisé des autocollants en chipboard, des die-cuts et des découpes en calque. J'ai également parsemé ma page d'enamel dots blancs et de quelques gouttes d'encre noire.

Next I added more embellishments above and under the picture. I used chipboard stickers, die cuts, and vellum accents. I also sprinkled the page with white enamel dots and a few droplets of black ink.


Comme j'avais l'impression qu'il manquait encore un petit quelque chose à ma page, j'ai décidé de tracer un cadre au stylo noir que j'ai ensuite décoré avec des cœurs du set de tampons More than Words que j'ai tamponnés avec de l'encre noire. J'aime beaucoup la touche d'originalité que cette bordure apporte à la page!

At that point, I felt like my layout needed a little something more and I decided to doodle a border all around the page with a black pen. To complete my doodled border, I played again with the More than Words stamp set and stamped cute hearts using black ink. I love the homespun and whimsical look my border gives to the page!


Merci beaucoup d'être passé par ici!J'espère que cette page vous donnera envie de vous amuser avec les tampons et les embellissements de cette belle collection!

Thanks so much for stopping by! I hope you are inspired to have fun with the More than Words stamps and embellies!


Elodie


vendredi 13 juillet 2018

You Make Me Feel Happy - Pink Paislee


Bonjour à tous!

J'espère que vous allez bien! Je suis de retour avec un tout nouveau projet que vous pouvez retrouver aujourd'hui sur le blog de Pink Paislee. Je me suis amusée avec la belle collection Pick-Me-Up et j'ai fait une page colorée sur ma petite dernière déguisée en danseuse de flamenco pour Halloween il y a quelques années.

Hi everyone!

I hope you are doing well! I'm back with a new scrappy project that is up today on the Pink Paislee blog. I had fun with the beautiful Pick-Me-Up collection and made a colorful page all about my youngest daughter dressed up as a flamenco dancer for Halloween a few years ago. So sweet!


Pour aller avec cette photo pleine de gaieté, j'ai opté pour un fond coloré avec le verso du papier 5. J'adore cette association de couleurs!

To go with this happy photo of my girl, I went with a colorful background and chose the reverse side of Paper 5. How pretty is this combination of colors? I love it!


Tout d'abord, j'ai découpé des bandes en bas de plusieurs feuilles 30x30, je les ai à nouveau coupées de différentes tailles, je les ai recourbées légèrement puis je les ai placées sur le papier de fond en suivant les motifs de points de couture. J'ai ensuite matté la photo avec une feuille du paper pad et je l'ai collée en bas de la page à la jonction des bandes.

First, I cut strips at the bottom of several 12x12 papers, cut them again in different sizes, bent them up a bit and placed them on the background paper following the stitching pattern. I then matted the photo with a sheet from the 6x6 paper pad and I adhered it at the bottom of the page where the paper strips meet.


Pour cette page, j'ai voulu mettre l'accent sur les couleurs et je suis partie sur une mise en page en ton sur ton. A l'aide de découpes de l'ephemera pack que j'ai utilisées comme gabarits, j'ai dessiné des cœurs dans plusieurs feuilles roses, rouges et beiges des paper pads de la collection. Je les ai découpés avec des ciseaux de précision, les ai recourbés légèrement pour les faire ressortir sur le fond et je les ai placés sur la couleur correspondante. J'aime le relief qu'ils apportent à la page!

For this layout, I wanted to focus on color and went with a tone-on-tone design. Using die cuts from the Pick-Me-Up ephemera pack as templates, I drew hearts in several pink, red, and beige papers from the 6x6 and 12x12 paper pads. I cut them using craft scissors, bent them up to make them stand out from the background, and placed them on their matching color. I like the dimension they give to the page!


J'ai décoré certains cœurs avec des rub-ons, quelques die-cuts ainsi qu'avec des autocollants en cardstock et en chipboard.

I embellished some hearts with cute rub-ons, a couple of die cuts, and cardstock & chipboard stickers.


J'ai également orné ma photo avec des embellissements en ton sur ton. J'ai glissé un napperon, une carte de journaling, un autocollant et une découpe florale sous la photo et j'ai utilisé un autre die-cut pour le titre.

I also adorned my sweet picture with tone-on-tone embellies. I tucked a doily, a journaling card, a sticker, and a floral die cut under the photo and I used another die cut for the title.


J'espère que ma page vous donnera envie d'essayer cette technique en ton sur ton et de vous amuser avec la collection Pick-Me-Up! Merci de votre visite et à bientôt!

Thank you so much for joining me today! I hope you are inspired to give this tone-on-tone technique a try and play with the colorful Pick-Me-Up collection!


Elodie


mardi 3 juillet 2018

Hey Cards - Pink Paislee


Bonjour!

Je suis déjà de retour avec un nouveau projet que vous pouvez retrouver aujourd'hui sur le blog de Pink Paislee. Je me suis amusée avec la très jolie collection Wild Child et j'ai réalisé des cartes destinées aussi bien aux plus petits qu'aux plus grands!

Hi!

I'm already back with a brand new project that I'm sharing today on the Pink Paislee blog. I played with the super pretty Wild Child collection and made a fun set of hello cards for kids and grown-ups too!


J'aime créer des scènes sur mes projets. C'est ce que j'ai fait ici avec les deux collections Wild Child. Je suis fan de ces couleurs vives et de ces motifs enfantins!

I like creating scenes on my projects. This is what I did here using the two Wild Child lines. I can't get enough of those happy colors and patterns!


J'ai commencé par faire les bases de mes cartes en pliant deux feuilles provenant des paper pads en deux. J'adore ce format! J'ai ensuite surmonté mes cartes de rectangles découpés dans d'autres papiers à motif des paper pads. J'ai cousu les bords avec du fil blanc et bleu foncé pour apporter de la texture et encadrer mes scènes.

I started by making the bases of my cards and folded two sheets from the 6x6 paper pads in half. I love that fun size! I then topped my cards with rectangles that I cut in more patterned papers from the 6x6 pads. I hand stitched the edges with white and dark blue thread to add texture and frame my little scenes.


Pour ma carte féminine, je suis parie sur l'idée d'un soleil pour aller avec l'autocollant en chipboard "hey sunshine" que je voulais utiliser pour le titre. J'ai découpé un cercle dans une feuille jaune du paper pad et je l'ai collé au centre de la carte avec de la mousse 3D. Je suis ensuite passée aux rayons de soleil et j'ai glissé des bandes de papier sous le cercle. J'ai placé le titre sur mon soleil en papier et j'ai embelli ma carte avec quelques autocollants en cardstock et en chipboard.

For the girl card, I went with a sun design to echo the "hey sunshine" chipboard sticker I wanted to use for the sentiment. I cut a circle in a yellow paper from the 6x6 pad and adhered it in the center of the card with foam tape. Next I moved on to making the sunrays and tucked patterned paper strips under the circle. I placed the sentiment on my paper sun and embellished my card with a couple of cardstock and chipboard stickers.


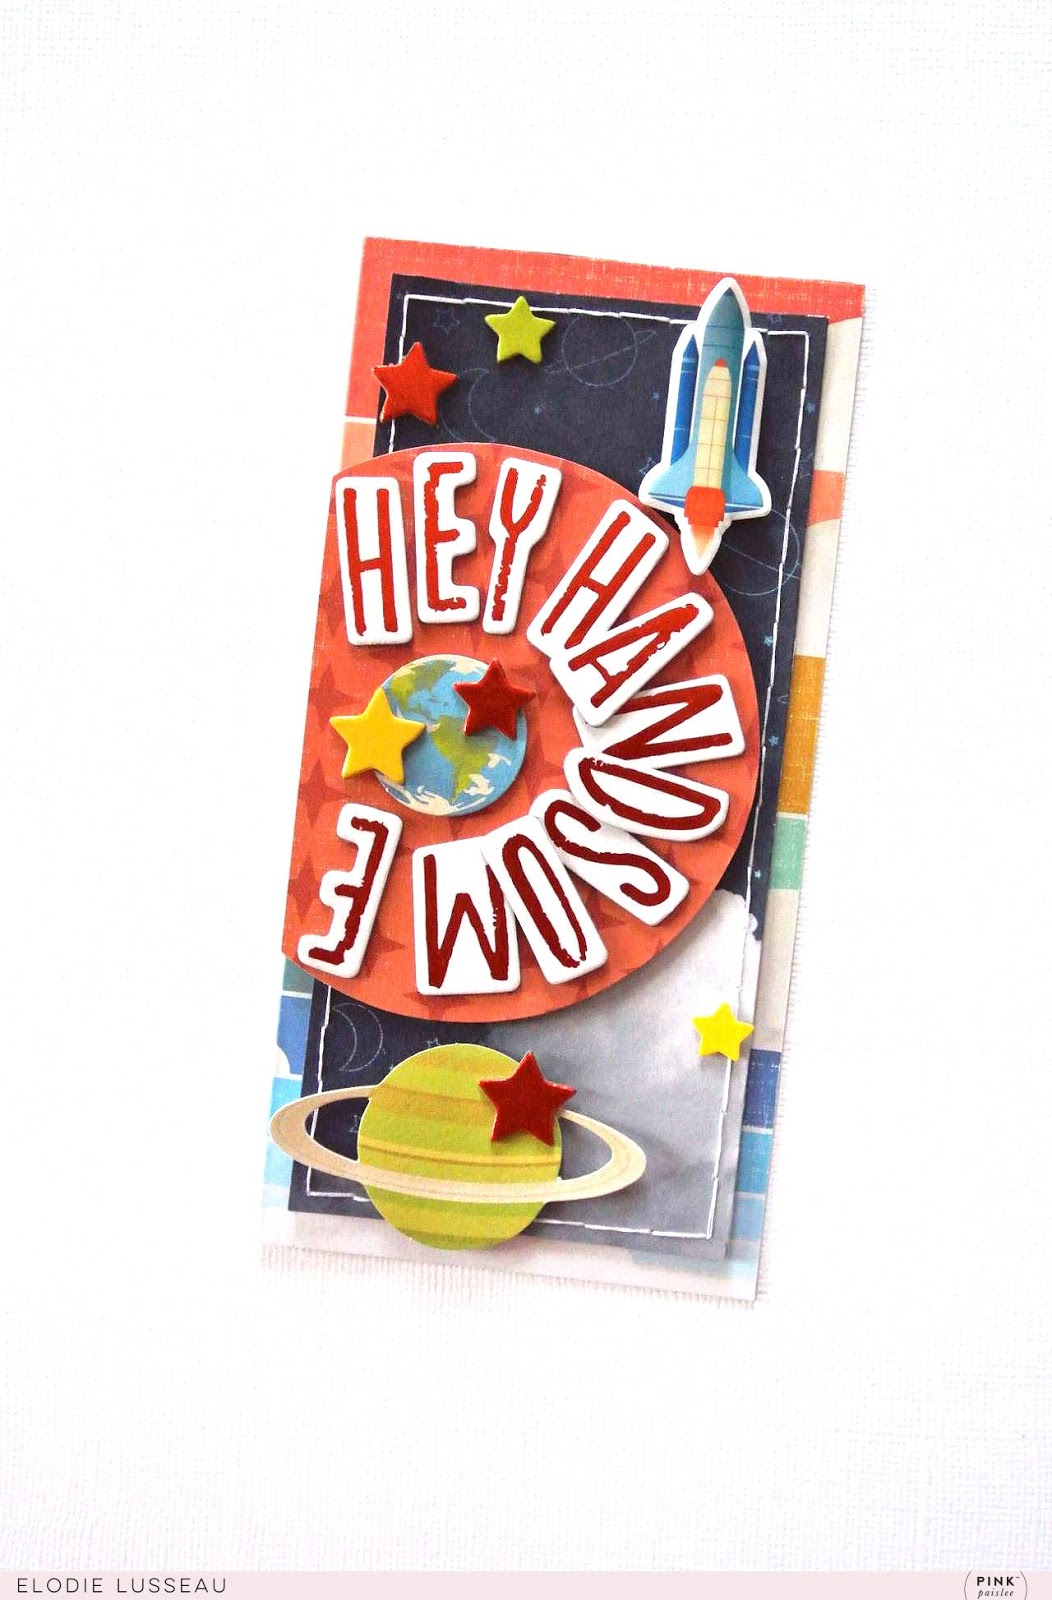
Pour ma deuxième carte, je me suis inspirée des planètes et des fusées de la collection masculine et j'ai créé une scène spatiale. J'ai découpé un cercle dans une feuille du paper pad et je l'ai placé au bord de la carte pour reproduire une planète. Je l'ai orné d'une découpe, d'étoiles en chipboard et des lettres autocollantes "hey handsome" pour le titre. J'ai complété ma carte masculine avec une planète de l'ephemera pack, une fusée de la feuille de puffy stickers ainsi qu'avec des étoiles autocollantes.

For my boy card, I was inspired by the cute planets and rockets in the boy line and created a space scene. I cut a circle in a paper from the 6x6 pad and placed it on the edge of the card to mimic a planet. I adorned it with a die cut, chipboard stars, and with the "hey handsome" chipboard stickers for the sentiment. I completed my boy card with a planet die cut, a cute rocket from the puffy sticker sheet, and star stickers.


Merci de vous être joint à moi aujourd'hui! J'espère que mes cartes vous donneront envie de vous amuser avec cette belle collection!

Thank you for joining me today! I hope you are inspired to have fun with this awesome collection!


Elodie


Rad - Cocoa Vanilla Studio


Bonjour!

Vous pouvez me retrouver aujourd'hui sur le blog de Cocoa Vanilla Studio avec un tout nouveau projet. Cette semaine, nous mettons les rayures et les étoiles à l'honneur. Pour ma page, j'ai utilisé la collection You Rock ainsi qu'une photo de ma fille aînée en pleine séance d'acrobatie dans une rue de Tarragone lors d'un voyage en Espagne il y a deux ans.

Hello there!

It's my turn on the Cocoa Vanilla Studio blog today! I made a fun and bright layout using stars, stripes, the awesome You Rock collection and a photo of my oldest girl doing acrobatics in a street of Tarragona during a trip in Spain a few years ago.


J'ai commencé par chercher un papier de fond dans la collection et je me suis arrêtée sur la feuille In Line. J'adore ces rayures toutes douces et cet effet peinture!

I started by looking for a background paper in my You Rock supplies and I chose the pretty In Line sheet. I love those soft painty stripes!


Je suis partie sur un design fun et original en utilisant uniquement les bords de la page. J'ai découpé des étoiles dans le papier Starshine et je les ai placées tout autour de la page. Je les ai recourbées légèrement et j'en ai collées quelques unes avec des carrés de mousse 3D pour apporter du volume.

For this layout, I decided to go with a fun design and to use only the edges of the page. I fussy cut stars in the Starshine paper and arranged them all around the border of my layout. I bent them up a bit and adhered some of them with foam squares to add dimension to the page.


J'ai également utilisé des découpes en bois, des die-cuts, des autocollants en chipboard, des rubber charms et des mots autocollants. J'aime beaucoup la manière dont les embellissements colorés ressortent sur le fond clair!

I also used wood veneer pieces, die cuts, chipboard stickers, cute rubber charms, and word stickers from the accessory sticker sheet. I like how the colorful embellies stand out against the soft background!


J'ai collé la photo à gauche de la page avec de la mousse 3D pour la mettre en avant et je l'ai ornée d'un onglet autocollant et d'un rubber charm pour le titre. Enfin, j'ai ajouté encore plus de couleurs avec des enamel shapes et j'ai terminé ma page avec quelques gouttes d'encre noire.

I adhered the photo on the left side of the page with foam tape to make it pop and I adorned it with a tab sticker and a rubber charm for the title. Finally, I added more color with bright enamel shapes and I completed my page with droplets of black ink.


J'adore associer cette collection masculine avec des photos de mes filles et j'espère que ma page vous donnera envie d'utiliser You Rock et Boys Rule pour des projets féminins! Merci de votre visite et à très vite!

I have so much fun using this boy line with photos of my girls and I hope you are inspired to use You Rock and Boys Rule for feminine projects as well! Thanks so much for stopping by! See you again soon!


Elodie