jeudi 28 février 2019

Be You


Hi there!

I have a new layout to share with you today. I played again with the Pinkfresh Studio Be You collection and made a dreamy page using a photo of my youngest girl snapped on the beach a year ago and a couple of Blooming Garden dies by Spellbinders.

Bonjour!

Je suis de retour en cette fin de mois avec une toute nouvelle page à partager avec vous. J'ai à nouveau utilisé la collection Be You de Pinkfresh Studio que j'ai associée à une photo de ma petite dernière sur la plage l'année dernière ainsi qu'à quelques dies de la collection Blooming Garden de Spellbinders.


For this layout, I decided to create clouds using paper doilies that I made with the Swirl Lattice Panel die from the Spellbinders Blooming Garden line and that I cut in half. I die cut the doilies in light papers from the Be You 6x6 paper pad and placed them on a dark background paper to make them pop. I love the soft and airy look they give to the page!

Pour cette page, j'ai voulu créer des nuages avec des napperons en papier que j'ai réalisés avec le die Swirl Lattice Panel de Spellbinders et que j'ai ensuite coupés en deux. J'ai utilisé des papiers clairs du paper pad Be You pour mes nuages et je les ai placés sur un papier de fond bleu foncé pour les faire ressortir. J'aime la douceur qu'ils apportent à la page!


I arranged my paper clouds in the center of the page, adhered the photo using foam squares and turned to embellishing my page. I die cut pretty flowers in more Be You 6x6 papers using the Blooming Garden Rose Buds dies and I scattered them on the picture and on the clouds. I adorned some of them with gold enamel dots and leaves from the Be You ephemera pack.

Après avoir disposé mes nuages en papier au centre de la page, j'ai collé la photo avec de la mousse 3D et je suis passée à la partie embellissement. J'ai fait de jolies fleurs avec les dies Rose Buds de la collection Blooming Garden et quelques feuilles du paper pad Be You et je les ai dispersées sur la photo et sur quelques nuages. J'en ai agrémentées certaines d'enamel dots dorés et de feuilles de l'ephemera pack Be You.


For the title, I used a wood and epoxy button that I placed on a paper circle under the photo and that I adorned with a die cut. I then embellished the clouds with die cuts, a puffy sticker and a few more wood buttons. Finally, I completed my layout with white enamel dots from my stash and a couple of leaves from the Be You collection.

Pour le titre, j'ai utilisé un bouton en bois que j'ai placé sur un cercle en papier sous la photo et que j'ai accompagné d'une découpe de l'ephemera pack. J'ai ensuite embelli mes nuages en papier avec des die-cuts, un puffy sticker et d'autres boutons en bois. Enfin, j'ai complété ma page avec des enamel dots blancs et quelques feuilles de la collection Be You.


I hope this page inspires you to have fun with your dies. Thank you so much for stopping by today! Have a great day!

J'espère que cette page vous donnera envie de vous amuser avec vos dies. Merci de vous être arrêté par ici et bonne journée!


Elodie


mercredi 20 février 2019

Some Kind of Wonderful


Hello everyone!

I'm popping in today to share a page all about our sweet girl Alba. We lost her a month ago and we miss her so much. She has been part of our family for 13 years and she will always be in our hearts. She was loving and playful, always in for a walk and a cuddle. She was wonderful. We love you, Alba.

Bonjour!

Je suis de passage aujourd'hui pour partager une page dédiée à notre adorable chienne Alba. Elle nous a quittés il y a un mois et elle nous manque tellement. Elle nous a apportés 13 années de bonheur et elle sera toujours dans nos cœurs. Elle était affectueuse et joueuse, toujours partante pour une balade et un câlin. Elle était magnifique. On t'aime, Alba.


For this layout about my beautiful girl, I wanted to use the Willow Lane collection by Maggie Holmes and Crate Paper and started by fussy cutting butterflies in the Flutter paper. I decided to place them in circles at the top and at the bottom of the page and got busy hand stitching two half circles in the Sweet One paper using white thread. I then arranged the butterflies on the stitched circles, along with a few heart and star stickers from the collection. I folded my paper butterflies up a bit before sticking them down to add dimension to the page.

Pour cette page en hommage à ma belle Alba, je voulais utiliser la collection Willow Lane de Maggie Holmes et Crate Paper et j'ai commencé par découper des papillons dans le papier Flutter. J'ai décidé de les placer en couronne en haut et en bas de la page et je me suis affairée à coudre deux demi-cercles dans le papier Sweet One avec du fil blanc. J'ai ensuite disposé les papillons sur mes cercles en ajoutant des étoiles et des cœurs autocollants de la collection. J'ai plié légèrement mes papillons avant de les coller pour apporter du relief à la page.


I backed my sweet photo with a couple of papers from the Willow Lane 6x8 paper pad and I adhered it in the top wreath. I scraped the edges of the papers with scissors to add detail and texture. I then turned to embellishing the picture with banner stickers, more butterflies, a heart sticker, ephemera pieces, and a doily from my stash. I also stamped little hearts on one of the die cuts using black ink and the Paige Evans Take Me Away roller stamp.

J'ai matté ma jolie photo avec quelques papiers du paper pad Willow Lane et je l'ai collée dans la couronne du haut. J'ai usé les bords des papiers avec des ciseaux pour ajouter du détail et de la texture.J'ai ensuite décoré la photo avec des bannières autocollantes, quelques papillons, un cœur autocollant, des die-cuts et un napperon. J'ai également tamponné des petits cœurs sur une des découpes avec de l'encre noire et le tampon à roulette Take Me Away de Paige Evans.


For the title, I used another banner sticker that I layered on a die cut. I placed it in the bottom wreath and adorned it with a glittery star sticker. I put the finshing touch to my page with some pink enamel dots from my stash and a few droplets of black ink.

Pour le titre, j'ai utilisé une autre bannière autocollante que j'ai superposée sur une découpe de l'ephemera pack. Je l'ai placé dans la couronne du bas et je l'ai orné d'une étoile scintillante. J'ai apporté la touche finale à ma page avec des enamel dots roses et quelques gouttes d'encre noire.


Thank you so much for joining me today! Bye for now!

Merci beaucoup de vous être joints à moi aujourd'hui et à bientôt!


Elodie


vendredi 15 février 2019

Love


Hi there!

I hope you had a happy Valentine's Day! I'm back with a new layout inspired by the Paper Issues You Are So Bow-tiful challenge that is all about using bows on a project. For my page, I played with the Pinkfresh Studio Be you collection, a couple of cute tassel bows and a sweet photo of my girls snapped in Verona two years ago.

Bonjour!

J'espère que vous avez passé une joyeuse Saint Valentin! Je suis de retour avec une nouvelle page inspirée par le You Are So Bow-tiful challenge de Paper Issues pour lequel il faut orner un projet de nœuds. Pour cette page, j'ai utilisé la collection Be You de Pinkfresh Studio ainsi qu'une jolie photo des filles prise à Vérone il y a deux ans.


I went with a fun and simple design and decided to place the photo and the embellies along the bottom left corner of the page. I matted the photo with a couple of papers from the Be You 6x6 paper pad and adhered it with foam squares. I tucked a doily from my stash under the picture and then turned to the embellishing part.

Je suis partie sur une mise en page simple en plaçant la photo et les embellissements le long du coin inférieur gauche de la page. J'ai d'abord matté ma photo avec des papiers du paper pad Be You et je l'ai collée le long du bord gauche avec de la mousse 3D. J'ai glissé un napperon sous la photo et je suis passée à la partie embellissement.


I arranged pretty Be You embellishments along the edges of the page and adhered some of them with foam squares for dimension. I used ephemera pieces, puffy stickers, tassel bows and a cute wood and epoxy button for the title. I finished my layout by adding pink enamel dots and gold foiled puffy stickers here and there.

J'ai disposé de jolis embellissements de la collection au bord de la page et j'en ai collés quelques-uns avec de la mousse 3D pour plus de relief. J'ai utilisé des découpes de l'ephemera pack, des puffy stickers, des nœuds en laine et un bouton en bois pour le titre. J'ai terminé ma page en ajoutant quelques enamel dots roses et des autocollants dorés de la collection ici et là.


You can play along with this challenge and find all the February challenges in the Paper Issues Friends and Fans Facebook group. Thank you so much for joining me today! Have a great day!

Vous pouvez participer à ce challenge et retrouver tous les challenges de février dans le groupe Facebook Paper Issues Friends and Fans. Merci de vous être joints à moi aujourd'hui et à bientôt!


Elodie


mercredi 30 janvier 2019

Love Cards - Pink Paislee


Hi friends!

It's my turn to share a new project on the Pink Paislee blog today! It's also my final post as a member of the Design Team. I've had a wonderful time on this fantastic team and I've loved playing with the gorgeous Pink Paislee collections this year. For this last post, I made a set of love cards using the beautiful Auburn Lane line. These cards will be perfect for Valentine's Day!

Bonjour à tous!

C'est à mon tour de partager un nouveau projet sur le blog de Pink Paislee! C'est aussi mon dernier post en tant que membre de la Design Team. J'ai adoré faire partie de cette fantastique équipe et créer avec les superbes collections Pink Paislee cette année. Pour ce dernier post, j'ai fait des cartes avec la belle collection Auburn Lane. Elles seront parfaites pour la Saint Valentin!


Did you know that the Auburn Lane collection comes with a 6x8 card making paper pad? It's super handy and perfect to create card panels. I used it to make the base of my cards and picked two floral papers that I folded in half to get 6x4" cards. So easy!

Saviez-vous que la collection Auburn Lane comprend un paper pad dédié à la création de cartes? Il est très pratique et parfait pour réaliser les bases de vos cartes. C'est ce que j'ai fait en pliant deux papiers floraux en deux pour obtenir des cartes de dimension 10x15 cm.


Next I topped my card panels with rectangles that I cut in two more papers from the card making paper pad. I scraped the edges with scissors before sticking my paper rectangles down for extra detail and texture.

J'ai ensuite surmonté mes cartes de rectangles découpés dans deux autres feuilles du card making paper pad. J'ai usé les bords de mes rectangles en papier avec des ciseaux avant de les coller pour plus de détail et de texture.


I decided to use the same design on both cards and went with a snowflake wreath to give them a wintery look. I punched snowflakes in light papers from the card making paper pad and in gold foiled sheets from the 6x8 paper pad. I just love the combination of pink, gold, black, and white!

J'ai décidé d'utiliser le même design pour les deux cartes et je suis partie sur l'idée d'une couronne de flocons pour leur donner un côté hivernal. J'ai perforé des flocons dans des papiers clairs du card making paper pad et dans quelques feuilles dorées du paper pad 15x20. J'adore l'association du rose, du doré, du noir et du blanc!


I arranged my paper snowflakes in a circle on my cards and I moved on to the embellishing part. I tucked beautiful vellum flowers under some snowflakes and topped others with Auburn Lane fabric flowers, sequins from the mixed embellishment pack, and foam Thickers for the sentiment. I finished my love cards by adding a few black and white enamel dots here and there. I like how soft these cards look!

J'ai disposé mes flocons en cercle sur mes cartes et je suis passée à la partie embellissement. J'ai glissé des fleurs en calque sous quelques flocons et j'en ai ornés d'autres de fleurs en tissu, de sequins du mixed embellishment pack et de Thickers en mousse pour le titre. J'ai terminé mes cartes en ajoutant quelques enamel dots noirs et blancs ici et là. J'aime la douceur qui se dégage de ces cartes!


I hope you are inspired to make Valentine's Day cards using gorgeous Auburn Lane supplies. Thank you so much for joining me today and for your support this year! And thank you to Paige, Elisabeth and the team for having me! It's been a beautiful journey!

J'espère que je vous ai donné envie de faire vos cartes de Saint Valentin avec la superbe collection Auburn Lane. Merci de vous être joints à moi aujourd'hui et de votre soutien tout au long de cette année! Et un grand merci à Paige, Elisabeth et à toute l'équipe pour cette belle aventure!


Elodie


mardi 29 janvier 2019

Sparkle - Spellbinders


Hello everyone!

I'm back with a new layout I made for Spellbinders using a couple of goodies from the beautiful Artomology collection by Jane Davenport. I played with the Fair Feathers dies, the Colorist Stickers and the Washi Girls washi sheets to make a dreamy summer page with a photo of my girls having fun in their inflatable pool.

Bonjour à tous!

Je suis de retour avec une page que j'ai réalisée pour Spellbinders avec quelques produits de la belle collection Artomology de Jane Davenport. Je me suis amusée avec les dies Fair Feathers, les autocollants Colorist et les feuilles de washi Washi Girls pour faire une page estivale avec une photo des filles dans leur piscine gonflable.


I started my layout by die-cutting pretty feathers in the Washi Girls sheets using the Fair Feathers dies and my Platinum 6 die cutting machine. I decided to arrange them in a circle on the top right corner of a white cardstock sheet to make a wreath. I fussy cut one of Jane Davenport's beautiful girls in the Washi Girls sheets and I tucked it under some feathers at the bottom of the wreath. I then adhered my photo in the wreath using foam squares to make it pop. The gorgeous Artomology colors go great with this summer snap of my girls!

J'ai commencé par découper de jolies plumes dans les feuilles Washi Girls à l'aide des dies Fair Feathers et de ma machine de découpe Platinum 6. J'ai décidé de les disposer en cercle dans le coin supérieur droit d'un cardstock blanc pour former une couronne. J'ai découpé une des superbes filles de Jane Davenport dans une des feuilles Washi Girls et je l'ai glissée sous les plumes en bas de la couronne. J'ai ensuite collé ma photo dans la couronne avec des carrés de mousse 3D pour la faire ressortir. Les belles couleurs de cette collection s'accordent parfaitement avec cette photo estivale des filles!


Next I moved on to embellishing the wreath and the picture using the pretty Colorist stickers. You can actually color them using Jane Davenport's inks, markers and paints. I decided to use them as is. I like the contrast between those black and white stickers and the bright Artomology colors!

Je suis ensuite passée à la partie embellissement et j'ai orné la couronne et la photo avec les autocollants Colorist. Il est possible de les colorer avec les encres, les marqueurs et les peintures de Jane Davenport. J'ai préféré les laisser tels quels. J'aime le contraste entre ces autocollants noirs et blancs et les couleurs vives de la collection!


I wanted to add something on the bottom left part of my layout and I fussy cut a corner from one of the Washi Girls sheets I used to die-cut the feathers. I placed it on the bottom left corner of the page and I added a feather sticker, another die-cut feather and a fussy cut word from one of the washi sheets for the title.  I love those negative feathers! It's a fun way to use those washi sheets! Finally, I completed my summer page with enamel dots and sequins from the Spellbinders January Card Kit and with a few droplets of black ink.

Je voulais ajouter quelque chose en bas de la page et j'ai décidé de découper un coin d'une feuille de washi que j'avais utiliser pour les plumes. Je l'ai placé dans le coin inférieur gauche de ma page et j'ai ajouté une plume autocollante, une autre plume réalisée avec un des dies Fair Feathers et un mot découpé dans une des feuilles Washi Girls pour le titre. J'adore ces plumes en négatif! C'est une manière originale d'utiliser ces feuilles de washi! Enfin, j'ai terminé ma page d'été avec des enamel dots et des sequins du January Card Kit de Spellbinders et avec quelques gouttes d'encre.


I hope this layout inspires you to have fun with the gorgeous Artomology collection! You can actually get the Fair Feathers dies, the Colorist stickers and the Washi Girls washi sheets as a gift for any $75 purchase in the Spellbinders store. Be sure to check it out! Thank you so much for joining me today! See you again soon!

J'espère que cette page vous donnera envie de vous amuser avec la belle collection Artomology! En ce moment, les dies Fair Feathers, les autocollants Colorist et les feuilles Washi Girls vous sont offerts pour tout achat de 75$ dans la boutique Spellbinders. Merci beaucoup de vous être joints à moi et à bientôt!


Elodie


vendredi 18 janvier 2019

Wonderful - Pink Paislee


Hello crafty friends!

Hope you had an awesome week! I'm popping in today to share a new layout that is up today on the Pink Paislee blog. I used the beautiful Whimsical collection to make a colorful page about my girls with a photo snapped during a winter walk on the beach. I can't get enough of the bright Whimsical colors! They are perfect to create rainbow projects.

Bonjour à tous!

J'espère que vous avez passé une bonne semaine! Je suis de retour avec une nouvelle page que vous pouvez retrouver aujourd'hui sur le blog de Pink Paislee. J'ai utilisé la belle collection Whimsical pour réaliser une page haute en couleurs avec une photo des filles prise lors d'une balade sur la plage l'hiver dernier. Je ne me lasse pas des couleurs vives de cette collection! Elles sont parfaites pour créer des projets aux tons arc-en-ciel.


My idea for this layout was to make a scalloped background using half paper circles. So I got busy drawing circles from Paper 06, Paper 10, Paper 11, Paper 13, Paper 14, Paper 15, Paper 18, Paper 20, and Paper 23. I then cut my paper circles in half and lined them up on Paper 24 to create a rainbow.

Pour cette page, je suis partie sur l'idée d'un fond avec des bannières faites avec des demi-cercles en papier. J'ai donc dessiné et découpé des cercles dans les papiers 06, 10, 11, 13, 14, 15, 18, 20 et 23. J'ai ensuite coupé mes cercles en deux et je les ai alignés sur le papier 24 pour créer un arc-en-ciel.


Next I adhered my black and white photo in the center of the page using foam squares. I embellished it with beautiful Whimsical flowers and shiny star stickers and I tucked a die cut, chipboard stickers and a cardstock sticker for the title under it. I like how my picture stands out against that rainbow-colored background!

J'ai collé ma photo au centre de la page avec des carrés de mousse 3D. Je l'ai ensuite embellie avec de belles fleurs de la collection et des étoiles autocollantes et j'ai glissé une découpe, des pièces en chipboard et un autocollant en cardstock pour le titre juste en dessous. J'aime la façon dont ce fond arc-en-ciel fait ressortir ma photo en noir et blanc!


I then moved onto embellishing the background and I adorned my paper scallops with tone-on-tone embellishments. I topped them with fussy cut flowers from Paper 03, die cuts, cardstock stickers, flowers from the floral embellishment pack, and cute enamel shapes.

Je me suis ensuite affairée à embellir le fond et j'ai orné mes demi-cercles en papier avec des embellissements en ton sur ton. Je les ai surmontés de fleurs découpées dans le papier 03, de die-cuts, d'autocollants en cardstock, de découpes florales et d'enamel shapes.


To give even more dimension and depth to my layout, I curved the edges of my paper scallops and adhered some embellies with foam squares. I just love when everything pops from the page!

Pour apporter encore plus de volume et de profondeur à ma page, j'ai recourbé les bords de mes demi-cercles et j'ai collé quelques embellissements avec de la mousse 3D. J'aime que les différents éléments ressortent de la page!


I also placed some embellishments on the edges of the page to add a fun and playful touch to my layout.

J'ai également placé quelques embellissements sur les bords pour ajouter une touche de fantaisie à ma page.


Thanks so much for stopping by today! I hope you are inspired to create rainbow-colored layouts and warm up your winter projects with the bright Whimsical collection!

Merci de vous être arrêté par ici! J'espère que cette page vous donnera envie de créer des projets aux couleurs de l'arc-en-ciel et de réchauffer vos pages d'hiver avec la collection Whimsical!


Elodie


mercredi 9 janvier 2019

Enjoy the Ride - Pink Paislee


Hi everyone!

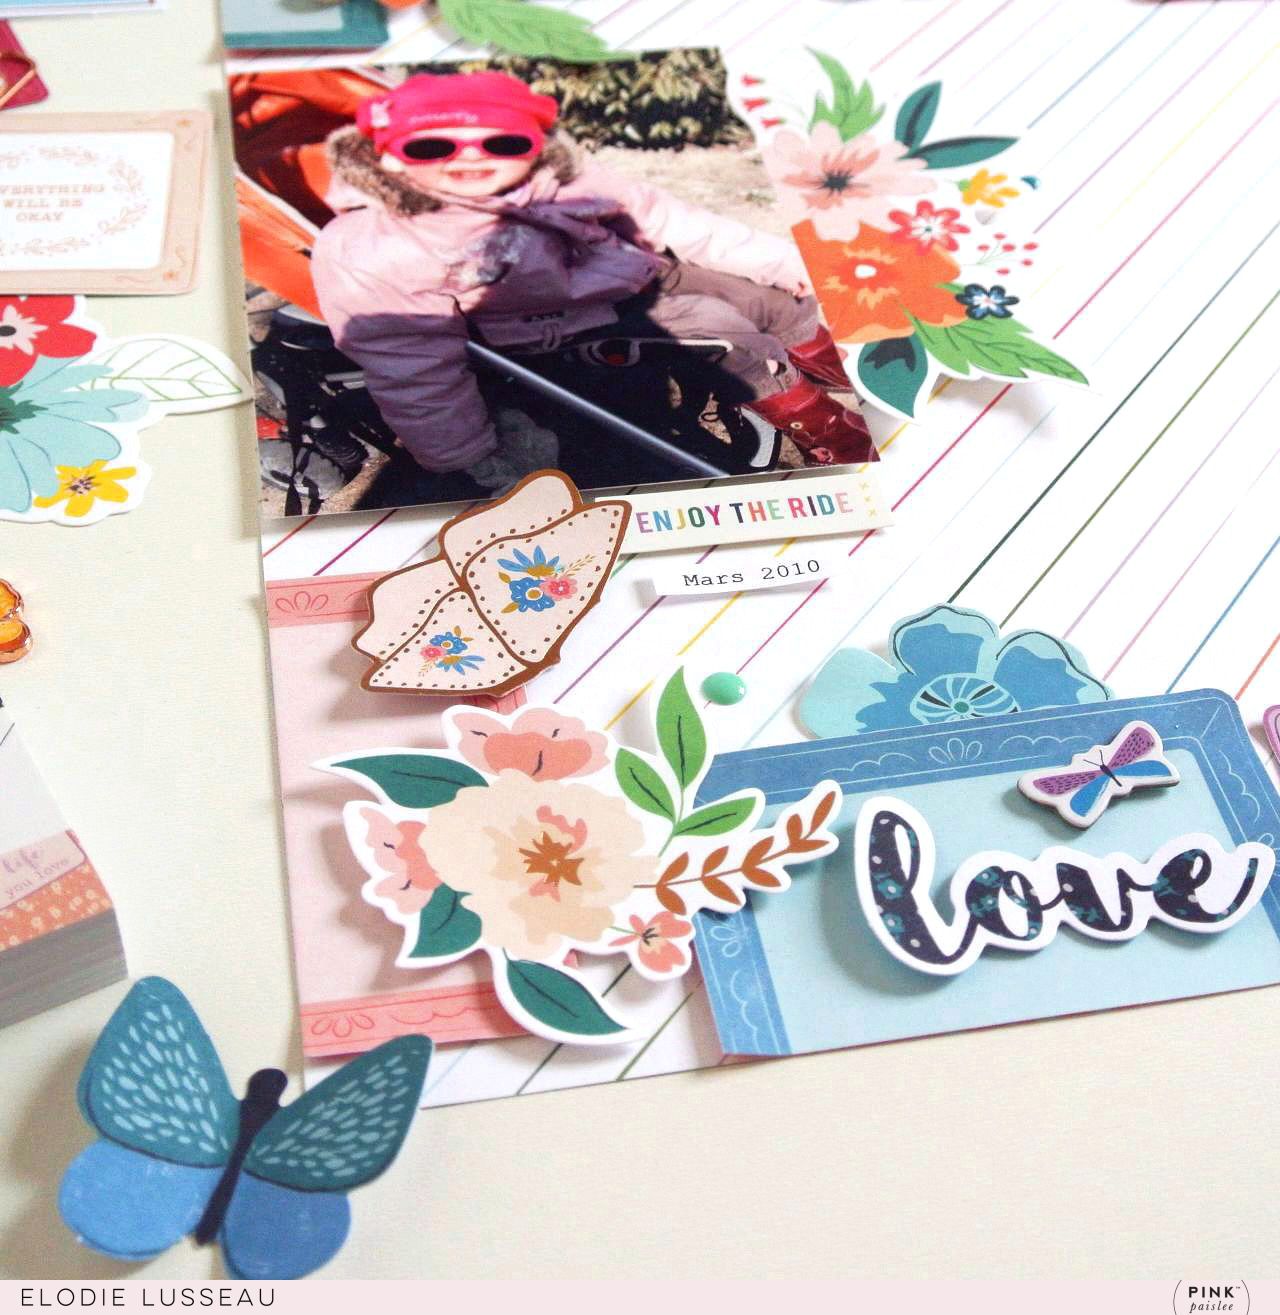
Happy Wednesday! Hope you're having a great week so far! I'm sharing my first layout of the year on the Pink Paislee blog today. I played with the beautiful Whimsical collection and made a fun and happy page using a photo of my oldest girl back when she was 2 years old. So sweet!

Bonjour à tous!

J'espère que vous passez une bonne semaine! Vous pouvez me retrouver aujourd'hui sur le blog de Pink Paislee avec ma première page de l'année. Je me suis amusée avec la belle collection Whimsical et j'ai fait une page pleine de couleurs et de gaieté avec une photo de ma fille aînée à 2 ans. Trop chou!


For this layout, I wanted to use the colorful frames from Paper 07 and Paper 13. I started by fussy cutting some of them and then looked for a background paper to showcase them. I finally settled on the light Paper 05 to make my frames pop from the page.

Pour cette page, je voulais utiliser les cadres colorés des papiers 07 et 13. J'ai commencé par en découper plusieurs et je suis ensuite partie à la recherche d'un papier de fond pour les disposer. J'ai opté pour un fond clair avec le papier 05 pour bien faire ressortir mes cadres.


To give a fun and eye-catching look to my layout, I decided to place the frames and the photo on the edges of the page. I bent up my frames a bit before sticking them down and I adhered the picture with foam squares for dimension.

Pour apporter une touche originale à ma page, j'ai décidé de placer les cadres et la photo sur les bords. J'ai recourbé légèrement les cadres avant de les coller et j'ai placé des carrés de mousse 3D sous ma photo pour plus de relief.


I tucked pretty Whimsical flowers under the photo and then moved on to embellishing my paper frames using die cuts, stickers, flowers and leaves from the floral embellishment pack, and a tassel paper clip. Those paper clips are just so cute and they are great to add a bit of texture and fun to a project.

J'ai glissé de jolies fleurs de la collection sous la photo et j'ai ensuite embelli mes cadres en papier avec des die-cuts, des autocollants, des fleurs et des feuilles du floral embellishment pack et un trombone. Ces trombones sont mignons comme tout et parfaits pour apporter un peu de texture à un projet.


For the title, I used a cardstock sticker that I placed under the photo along with a typed journaling strip with the date. That "enjoy the ride" sticker was just meant to go with this cute picture of my girl in her stroller!

Pour le titre, j'ai utilisé un autocollant en cardstock que j'ai placé sous la photo avec une bande de journaling. Cet autocollant "enjoy the ride" était fait pour cette photo de ma puce dans sa poussette!


I completed my sweet page by adding a few enamel dots here and there. These are the perfect finishing touch!

Enfin, j'ai apporté la touche finale à ma page en ajoutant quelques enamel dots ici et là.


Thank you so much for visiting my blog today! I hope you are inspired to use the edges of your layouts and have fun with the Whimsical collection!

Merci beaucoup de votre visite! J'espère que cette page vous donnera envie d'utiliser les bords de vos pages et de vous amuser avec la collection Whimsical!


Elodie