dimanche 31 décembre 2017

Best 10 of 2017


Bonjour!

J'espère que vous allez bien et que vous passez de joyeuses fêtes! Pour le dernier jour de l'année, j'aimerais partager avec vous mes 10 projets préférés de 2017. Les voici!

Hi!

Happy holidays to you all! To celebrate the last day of the year, I'd like to share my favorite projects from 2017 with you. Here is my top 10!


J'ai fait cette page pour un des Scraplift Sunday de Paper Issues avec la jolie collection Millie & June de Fancy Pants. Je me suis inspirée d'une des magnifiques pages de Mary-Ann Maldonado.

I made this layout for Paper Issues' Scraplift Sunday using the pretty Millie & June collection by Fancy Pants. I lifted one of Mary-Ann Maldonado's beautiful pages.


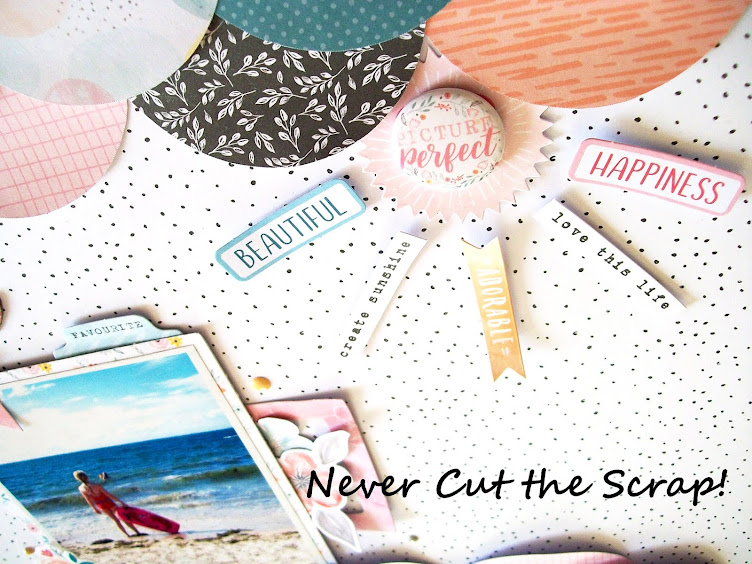
Pour cette page, j'ai utilisé la collection Chasing Dreams de Maggie Holmes et Crate Paper ainsi qu'un badge Feed Your Craft et je me suis inspirée du mood board de mars de Paper Issues.

For this page, I took inspiration from the Paper Issues March mood board using the Chasing Dreams collection by Maggie Holmes & Crate Paper and a Feed Your Craft flair badge.


J'ai réalisé cette page pour Cocoa Vanilla Studio avec la superbe collection Wild at Heart.

I created this layout for Cocoa Vanilla Studio using the gorgeous Wild at Heart collection.


J'ai fait celle-ci pour le Pawsitively Pets challenge d'avril de Paper Issues avec des papiers et embellissements Maggie Holmes, Simple Stories, Dear Lizzy, Fancy Pants et Pink Paislee.

I made this one for the Paper Issues April Pawsitively Pets challenge mixing supplies by Maggie Holmes, Simple Stories, Dear Lizzy, Fancy Pants and Pink Paislee.


Pour cette page, je me suis inspirée du Working Title challenge de mai de Paper Issues et j'ai utilisé la collection Take Me Away de Paige Evans & Pink Paislee.

For this one, I played along with the Paper Issues May Working Title challenge using Take Me Away by Paige Evans and Pink Paislee. 


J'ai fait cette carte d'anniversaire pour ma fille aînée avec la belle collection Oh My Heart de Paige Evans et Pink Paislee.

I made this colorful birthday card for my oldest girl  using the beautiful Oh My Heart collection by Paige Evans and Pink Paislee.


J'ai réalisé cette page avec une grande photo de mon petit rayon de soleil et la jolie collection Hello Lovely de Cocoa Vanilla Studio.

For this page, I used a large photo of my little miss sunshine and the super pretty Hello Lovely collection by Cocoa Vanilla Studio. 


Pour celle-ci, j'ai été inspirée par l'Issue de septembre de Paper Issues et je me suis amusée avec la collection Golden Days de Fancy Pants.

Here, I played along with the Paper Issues September Issue using the Golden Days collection by Fancy Pants.


J'ai fait cette page d'Halloween à l'occasion de la Fall Crop de Paper Issues avec la très jolie collection Turn the Page de Paige Evans et Pink Paislee. 

I created this Halloween page for the Paper Issues Fall Crop using the colorful Turn the Page collection by Paige Evans and Pink Paislee.


J'ai réalisé ces sacs cadeaux avec la collection Turn the Page ainsi qu'avec de jolis autocollants du #StickerBook de Paige Evans et j'ai eu la chance de pouvoir les partager sur le blog de Pink Paislee.

I made these gift bags for my guest designer spot on the Pink Paislee blog using the Turn the Page collection and cute stickers from the Paige Evans #StickerBook.


Merci beaucoup de votre soutien tout au long de cette année! Je vous souhaite un excellent réveillon et je vous dis à l'année prochaine!
Thank you so much for your support throughout the year! Happy New Year's Eve! See you next year!


Elodie


lundi 25 décembre 2017

Xmas


Bonjour!

Joyeux Noël! Je suis de passage aujourd'hui pour partager une carte de Noël réalisée avec la belle collection Snow and Cocoa de Crate Paper. La voici!

Hello!

Merry Christmas! I'm popping in today to share another Christmas card using the beautiful Snow and Cocoa collection by Crate Paper. Here it is!


Comme à mon habitude, j'ai utilisé une feuille de paper pad pliée en deux pour la base. J'ai ensuite fait des superpositions sur le dessus de ma carte avec du papier à motif, des die-cuts, un tag, de jolis flocons pailletés et un badge Feed Your Craft. Pour le titre, j'ai placé des lettres autocollantes de la collection Gather de Maggie Holmes sur une bannière découpée dans un papier à motif. J'ai terminé en ajoutant quelques sequins dorés.

I folded a Snow and Cocoa 6x6 paper in half for the base and topped it with patterned paper, die cuts, a tag, glittery snowflakes and a Feed Your Craft flair badge. For the title, I used pretty alpha stickers from the Gather collection by Maggie Holmes and placed them on a handcut banner. I put the finishing touch to my card with a couple of gold sequins.


Merci beaucoup de vous être arrêté par ici! Je vous souhaite une merveilleuse journée de Noël!
Thank you so much for stopping by! Wishing you a happy Christmas!


Elodie


mardi 19 décembre 2017

Joy


Bonjour!

J'espère que vous allez bien et que vous passez une bonne semaine! Je suis de passage aujourd'hui pour partager une carte de Noël inspirée par le Pinspire Me challenge de décembre de Paper Issues. J'ai repris les couleurs et le thème des fêtes du magnifique mood board créé par Mary-Ann Maldonado. Voici ma carte réalisée avec la jolie collection Snow and Cocoa de Crate Paper!

Hi there!

I hope you are doing well and enjoying your week! I'm popping in today to share a Christmas card using the super cute Snow and Cocoa collection by Crate Paper. I played along with the Paper Issues December Pinspire Me challenge and I was inspired by the soft colors, the Christmas theme and the deers of the gorgeous mood board created by Mary-Ann Maldonado. Here is my card!


Comme souvent, j'ai utilisé une feuille de paper pad pliée en deux pour la base de ma carte. J'ai ensuite superposé un morceau de papier à motif, un napperon, des die-cuts et une découpe en forme de bocal de la collection que j'ai remplie d'autres die-cuts et que j'ai ornée d'un nœud en twine. Enfin, j'ai ajouté une touche scintillante à ma carte avec de jolis flocons dorés Snow and Cocoa.

For the base of my card, I used a 6x6 paper that I folded in half. Then I made pretty layers using patterned paper, a doily, die cuts and a jar pocket that I filled with more die cuts and that I adorned with a twine bow. I also added a bit of shine to my card with a couple of glittery snowflakes.


Voici le superbe mood board de décembre!
Here is the beautiful December mood board!


Pour participer et partager vos projets inspirés du mood board de décembre, rendez-vous dans le groupe Facebook de Paper Issues! Merci de votre attention et à bientôt!
If you feel inspired by the December mood board and want to play along too, head over to the Paper Issues Facebook group! Thanks for looking and happy Tuesday!


Elodie


dimanche 17 décembre 2017

My Favourites - Cocoa Vanilla Studio


Bonjour!

Vous pouvez me retrouver aujourd'hui sur le blog de Cocoa Vanilla Studio pour mon dernier post de l'année! Ces deux prochaines semaines, les membres de l'équipe créative vont partager leurs projets favoris de 2017. Voici donc quelques-unes de mes pages préférées que j'ai réalisées cette année avec les magnifiques collections de Cocoa Vanilla Studio!

Hi!

I'm up on the Cocoa Vanilla Studio blog today for my last post of the year! To celebrate the end of the year, the members of the CVS Design Team will be sharing their favourite projects from 2017 over the next couple of weeks. Here are three of my favourite layouts from 2017 using beautiful Cocoa Vanilla Studio supplies!


J'aime beaucoup créer des scènes sur mes pages! Ici, j'ai réalisé un soleil avec de jolis papiers et embellissements de la collection Hello Lovely ainsi qu'avec une grande photo de ma petite dernière sur la plage. Comme elle, cette page respire la joie et la bonne humeur!

I love creating scenes on my layouts! Here, I made a big sun using a large photo of my youngest daughter on the beach as well as pretty Hello Lovely papers and embellies. This page is just as bright and happy as my little miss sunshine!


J'ai adoré associer la collection You Rock avec des photos des filles! Pour cette page, j'ai fait des tags avec des papiers et des bandes autocollantes de la collection, je les ai placés de part et d'autre de la photo et je les ai décorés avec des embellissements You Rock. J'ai également ajouté des étoiles découpées dans un papier de la collection et je les ai suspendues à la photo avec quelques points de couture. J'aime la douceur qui se dégage de cette page!

I really enjoyed making girly layouts with the You Rock collection! For this page, I created tags with You Rock papers and washi stickers, I placed them on each side of my sweet photo and I adorned them with awesome embellies from the range. I also made ornaments hanging down from the pic using fussy cut stars and a bit of stitching. I love how soft this page looks!


Pour cette page, j'ai utilisé la superbe collection Wild at Heart et une photo des filles qui jouent sur la plage. J'ai réalisé un grand papillon sur ma page avec d'autres papillons découpés dans un papier de la collection et des enamel dots pailletés pour les ailes. J'ai ensuite créer le corps en plaçant la photo et de jolis embellissements Wild at Heart au centre de la page. J'ai plié légèrement les papillons avant de les coller pour apporter du relief et de la légèreté.

For this layout, I used the gorgeous Wild at Heart collection along with a photo of the girls playing on the beach last winter. I made a big butterfly on my page using pretty fussy cut butterflies and sparkly enamel dots for the wings. Then I placed the pic and beautiful Wild at Heart embellies in the center of the page to create the body of my butterfly. So airy and dreamy!


Merci de vous être joint à moi! Je vous souhaite une bonne fin de weekend!
Thank you for joining me today! Happy Sunday!


Elodie


jeudi 14 décembre 2017

Happy Xmas


Bonjour!

J'espère que vous passez une bonne semaine! Je suis de passage aujourd'hui pour partager une carte de Noël que j'ai réalisée avec les belles collections Wild at Heart et Hello Lovely de Cocoa Vanilla Studio. La voici!

Hello!

I hope your week is going well! I'm popping in today to share a Christmas card I made with the beautiful Wild at Heart and Hello Lovely collections by Cocoa Vanilla Studio. Here it is!


J'ai découpé la base de ma carte en bas de la jolie feuille Patchwork, je l'ai pliée en deux et je l'ai agrémentée d'un morceau du papier Double Dot. Pour le titre, j'ai utilisé une découpe en bois Wild at Heart ainsi que des lettres autocollantes de la collection Hello Lovely et je l'ai placé en haut de la carte, sur un napperon. Enfin, j'ai ajouté des ornements dans l'esprit des décorations de Noël avec quelques points de couture, des enamel dots de la collection Hello Lovely, des découpes et un badge Wild at Heart.

I cut the base of my card in the pretty Patchwork sheet, I folded it in half and topped it with a piece of the Double Dot paper. For the title, I used a Wild at Heart wood veneer word along with alpha stickers from the Hello Lovely collection and I placed it at the top of the card, on a doily. Last but not least, I created christmassy ornaments with a bit of stitching, Hello Lovely enamel dots as well as die cuts and a flair button from the Wild at Heart collection.


Merci beaucoup d'être passé par ici! Je vous souhaite une belle journée!
Thanks so much for visiting my blog today! Wishing you a lovely day!


Elodie


mercredi 6 décembre 2017

Pink Paislee Guest Designer


Bonjour à tous!

J'espère que vous passez une bonne semaine! Je suis de retour avec une super nouvelle: vous pouvez me retrouver aujourd'hui sur le blog de Pink Paislee! J'ai la joie et la chance d'y partager quelques projets réalisés avec les collections Turn the Page et Oh My Heart ainsi qu'avec le tout nouveau #StickerBook de Paige Evans. Incroyable, non?! Voici mes projets!

Hi friends!

I hope you're having a great week so far! I have exciting news to share with you today! I'm so happy and lucky to be up on the Pink Paislee blog with some guest designer projects using the beautiful Turn the Page and Oh My Heart collections as well as Paige Evans's brand new #StickerBook. Incredible, right?! Here are my projects!


Love Everyday


J'aime beaucoup coudre sur mes pages. Ici, j'ai créé des quelques décorations qui pendent de la photo et du titre avec quelques points de couture, des sequins Turn the Page et des autocollants du #StickerBook de Paige Evans. J'ai matté quelques autocollants avec du papier blanc et je les ai collés à l'aide de carrés de mousse 3D pour les faire ressortir. J'adore le contraste entre la photo en noir et blanc et les papiers et embellissements colorés!

I really like stitching on my layouts. Here, I created ornaments hanging down from the photo and the title using Turn the Page sequins and pretty stickers from the Paige Evans #StickerBook. I backed some of the stickers with white paper and I adhered them with foam squares to make them pop. I love how the black and white pic stands out against the colorful papers and embellies!


Have Fun


Pour cette page d'Halloween, je suis partie sur un design géométrique et j'ai beaucoup travaillé sur le fond avec des cadres et des bandes de papier de la collection Turn the Page. J'ai recourbé les bords des papiers pour apporter du relief et j'ai créé des clusters avec des embellissements Turn the Page et des stickers du #StickerBook. J'ai également utilisé un des jolis autocollants dorés pour le titre.

I went with a fun and striking design for this Halloween layout using Turn the Page frames and paper strips. I folded up the edges of the papers for dimension and I made clusters with Turn the Page embellies and stickers from the #StickerBook. I also used one of the beautiful clear phrases stickers for the title.


Wonderful You


J'aime créer des scènes sur mes pages. Pour celle-ci, entièrement consacrée à ma chienne, j'ai fait une étoile filante avec des feuilles du paper pad Turn the Page et des bandes autocollantes du #StickerBook de Paige Evans. J'ai décoré mon étoile avec d'autres autocollants ainsi que des découpes de la collection Turn the Page. Enfin, j'ai ajouté une touche scintillante avec de jolis stickers dorés.

I love creating scenes on my layouts. For this page focusing on my Frenchie, I made a shooting star using Turn the Page 6x6 papers and washi strips from the Paige Evans #StickerBook. I embellished the star with more stickers as well as die cuts from the Turn the Page collection. I added a bit of shine to my page with beautiful copper foiled stickers.


Hello 6


J'ai fait cette carte colorée pour l'anniversaire de ma petite dernière qui a eu 6 ans il y a quelques jours. J'ai utilisé une feuille du paper pad Turn the Page pour la base. Tellement pratique et facile! J'ai ensuite superposé des morceaux de papiers à motif Oh My Heart et le chiffre six que j'ai dessiné, découpé et orné de jolis autocollants du #StickerBook. J'ai également cousu les bords du six pour plus de détails et de texture.

I made this colorful birthday card for my youngest daughter who turned 6 a couple of days ago. I used a paper from the Turn the Page 6x6 pad for the base. So handy and easy! Then I made pretty layers using Oh My Heart 6x6 papers and a handcut six that I adorned with lovely stickers from the #StickerBook. I also stitched the edges of the six for added detail and texture.


Christmas Gift Bags


C'est la première fois que je fais des sacs cadeaux et j'aime beaucoup le résultat! J'ai créé des petites scènes de Noël sur des sacs en kraft avec des papiers à motif Turn the Page et des animaux du #StickerBook de Paige Evans. J'ai également fait des sapins de Noël avec d'autres autocollants et des étoiles découpées dans un papier. J'ai ajouté des bandes autocollantes et des napperons pour le ciel et j'ai apporté la touche finale avec des étoiles autocollantes, des rubans et des trombones surmontés de lettres autocollantes. J'adore ces stickers qui peuvent être utilisés de nombreuses manières!

It's the first time I make gift bags and I love how they turned out! I created Christmas scenes on kraft bags using Turn the Page patterned papers and cute animals from the #StickerBook. I also made Christmas trees with more stickers and fussy cut stars. I added sticker strips and doilies for the sky and finished off my bags with star stickers as well as Turn the Page ribbons and paper clips that I topped with alpha stickers from the #StickerBook. I loved playing with these stickers: they can be used in so many fun and creative ways!


J'espère que ces quelques projets vous donneront envie de mettre la main sur ce joli #StickerBook! Merci beaucoup de vous être arrêté par ici! A bientôt!
I hope these projects inspire you to get your hands on this awesome #StickerBook! Thank you so much for stopping by! Wishing you a great day!


Elodie


dimanche 3 décembre 2017

Lovely Elves - Cocoa Vanilla Studio


Bonjour!

J'espère que vous allez bien et que vous passez un excellent weekend! Je suis de retour avec une nouvelle page que vous pouvez retrouver aujourd'hui sur le blog de Cocoa Vanilla Studio où nous attendons Noël avec impatience! Ces deux prochaines semaines, nous allons partager des projets de Noël réalisés avec des collections sans aucun lien avec Noël. Pour ma page, j'ai utilisé la superbe collection Bohemian Dream ainsi qu'une photo de mes deux elfes prise il y a quelques années.

Hi there!

I hope you are well and enjoying your weekend! I'm back with a brand new layout that is up today on the Cocoa Vanilla Studio blog. We're getting in the mood for Christmas and we'll be sharing some Christmas projects using non-Christmas supplies over the next couple of weeks. For my page, I used the beautiful Bohemian Dream collection along with a photo of my two elves snapped a few years ago.


Pour aller avec le thème, j'ai décidé de créer des boules de Noël sur ma page. J'ai donc commencé par dessiner et découper des cercles: un grand dans le papier Beautiful Mess et trois petits dans plusieurs feuilles du paper pad Bohemian Dream.

To go with the Christmas theme, I decided to create tree ornaments on my page. I started by drawing and cutting circles to make my Christmas decorations: a big one in the colorful Beautiful Mess sheet and three little ones in several papers from the Bohemian Dream 6x6 pad.


J'ai cousu les bords du grand cercle avec du fil blanc et je les ai tous placés sur le papier Wild & Free que j'ai choisi pour le fond. Pour faire pendre mes boules de Noël, j'ai dessiné des lignes verticales sur le papier de fond et je les ai percées avec une aiguille. Après avoir effacé les traits de crayon, je les ai cousues avec du fil blanc.

I stitched the edges of the big circle with white thread and I placed them all on the Wild & Free paper that I picked for my background. To make my tree ornaments look like they're hanging down, I drew vertical lines on the background paper and pierced them with a pin. After erasing the pencil marks, I handstitched them using white thread.


J'ai collé un cercle au bout de chaque ligne avec juste un point de colle et en recourbant les bords pour apporter du relief. J'ai ensuite placé la photo sur le grand cercle avec de la mousse 3D. J'adore le contraste entre la photo en noir et blanc et les jolies couleurs de la collection!

I sticked a circle at the end of each line using just a tiny bit of glue and folding up the edges to make them pop. I also placed the photo on the big circle using foam squares. I love the contrast between the black and white photo and the gorgeous Bohemian Dream colors!


Je me suis ensuite amusée à embellir ma page. J'ai dessiné des étoiles dans plusieurs feuilles du paper pad, en utilisant une étoile en bois de la collection You Rock comme gabarit, et je les ai découpées avec mes ciseaux de précision.Je les ai placées au bord du grand cercle avec d'autres embellissements de la collection: de belles fleurs en calque et en cardstock, des mots autocollants et des enamel hearts.

Next came the fun part: embellishing! I drew stars in several 6x6 paper, using You Rock wood veneer stars as templates, and I cut them with my craft scissors. I placed them on the edges of the big circle, along with more pretty Bohemian Dream embellies: beautiful florals from the vellum accent pack and the ephemera pack, word stickers from the accessory sticker sheet and cute enamel hearts.


J'ai orné la photo de die-cuts et d'un onglet autocollant et j'ai glissé un cadre de l'ephemera pack juste en dessous. J'ai ensuite décoré les autres cercles avec d'autres die-cuts, des découpes en calque, des enamel hearts, un badge et un autocollant sur lequel j'ai tamponné la date ainsi que le phrase "little moments" du set de tampons de la collection. J'ai également surmonté mes boules de Noël de découpes et d'enamel dots en guise d'accroches. J'ai terminé ma page en ajoutant un mot en chipboard ainsi que des lettres autocollantes de la collection Hello Lovely pour le titre, des formes en chipboard près du grand cercle et des sequins de la collection Make A Wish sur les fils.

I adorned the photo with die cuts and a tab sticker and I tucked a frame from the ephemera pack under it. Then I embellished the other circles with more die cuts, vellum accents, enamel hearts, a flair button and a sticker on which I stamped the date and the 'little moments' sentiment from the Bohemian Dream stamp set. I also topped my Christmas decorations with die cuts and enamel dots. I finished off my Christmas scene by adding a Bohemian Dream chipboard word and Hello Lovely alpha stickers for the title, chipboard flourishes at the bottom of the page and shiny sequins from the Make A Wish collection on the stitched lines.


Je me suis beaucoup amusée à faire cette page de Noël avec la belle collection Bohemian Dream et j'espère qu'elle vous donnera envie de l'utiliser aussi sur vos projets de Noël! Merci beaucoup de votre visite et bonne journée!

I had so much fun making this Christmas page using Bohemian Dream and I hope it inspires you to use this gorgeous collection on your projects too! Thank you so much for joining me today! Have a lovely day!


Elodie


vendredi 17 novembre 2017

Love This Life - Cocoa Vanilla Studio


Bonjour!

Je suis de retour avec une nouvelle page que vous pouvez retrouver aujourd'hui sur le blog de Cocoa Vanilla Studio. Cette semaine est consacrée au bleu et au rose avec des projets mettant l'accent sur une de ses deux couleurs. J'ai naturellement choisi le rose, ma couleur préférée, et j'ai utilisé la superbe collection Bohemian Dream ainsi qu'une photo des filles prise lors de notre voyage en Irlande en août dernier. Voici ma page!

Hi!

I'm back with a new page that is up today on the Cocoa Vanilla Studio blog. This week is all about pink and blue with projects focusing on one of these two colors. I just had to go with pink, my favorite color, and I used the gorgeous Bohemian Dream line along with a photo of the girls snapped in Ireland last August. Here is my pretty in pink layout!


Tout d'abord, j'ai passé en revue la collection à la recherche de papiers et d'embellissements roses que je pourrais utiliser sur ma page. Pour le fond, j'ai opté pour les papiers Boho Bits et Dreamer. J'ai coupé une bande dans la feuille Boho Bits et je l'ai placée en haut du papier Dreamer de façon à cacher la partie violette et à mettre l'accent sur le rose.

I started by going through my Bohemian Dream stash and picked pink paper and embellies that I could use on my layout. For the background, I went with the Boho Bits and Dreamer papers. I cut a strip in the Boho Bits sheet and placed it at the top of the Dreamer paper, covering the purple part to focus on the pink.


J'ai choisi un design simple et épuré en créant un cluster en haut de la page, à la jonction des deux papiers de fond.

I wanted to go for a simple design, with a lot of white - or rather pink - space and I decided to create a cluster at the top of the page where the two background papers meet.


J'ai imprimé ma photo en noir et blanc pour ne pas ajouter trop de couleurs à ma page et garder l'accent sur le rose. Je l'ai collée en haut de la page avec de la mousse 3D. J'adore la manière dont elle ressort avec tout ce rose!

I went with black and white for the photo to keep the focus on pink. I adhered it at the top of the page with foam squares. I love how it stands out against the pink background!


Pour le titre, j'ai utilisé des mots en chipboard que j'ai agrémentés d'un tampon de la collection et d'enamel shapes. Je les ai disposés sur des die-cuts ainsi que sur une fleur en calque.

For the title, I used chipboard words that I spiced up with the 'love' sentiment from the Bohemian Dream stamp set and cute enamel hearts. I layered them on die cuts and on a lovely flower from the vellum accent pack.


J'ai ensuite glissé un onglet autocollant, un cadre de l'ephemera pack et des fleurs en cardstock et en calque sous ma photo. J'ai terminé ma page avec des autocollants en chipboard, de jolis papillons en calque, quelques mots autocollants, une bannière de l'ephemera pack ainsi que des arabesques en chipboard.

Next, I tucked a tab sticker, a frame from the ephemera pack and pretty cardstock and vellum flowers under the pic. I finished off my page with chipboard stickers, beautiful vellum butterflies, a couple of word stickers, a banner from the ephemera pack and pretty flourishes from the chipboard title sticker sheet.


J'ai adoré faire cette page avec ma couleur préférée et j'aime beaucoup la façon dont les éléments en noir et blanc ressortent avec les jolis tons roses de cette collection! J'espère que ma page vous donnera envie d'essayer les projets monochromes et de vous amuser avec les produits Cocoa Vanilla Studio! Je vous remercie de votre visite et je vous souhaite une bonne journée!

I loved putting this page together using my favorite color and I really like how the black and white items pop against the beautiful Bohemian Dream pink tones! I hope this layout inspires you to give monochromatic projects a try and have fun with CVS supplies! Thank you for stopping by and happy Friday!


Elodie


mercredi 15 novembre 2017

Always happy


Bonjour à tous!

J'espère que vous allez bien! Je suis de passage aujourd'hui pour partager une toute nouvelle page avec vous. Je me suis inspirée du Notable Quotable challenge de Paper Issues, de la citation de novembre et de ses couleurs. J'ai utilisé la jolie collection Glitter Girl de Shimelle et American Crafts ainsi qu'une photo de mon petit rayon de soleil prise à l'automne dernier.

Hello friends!

I hope you're doing well! I'm popping in today to share a new page with you. I played with the Paper Issues Notable Quotable challenge and I was inspired by the November quote and its rainbow colors. I used the super pretty Glitter Girl collection by Shimelle and American Crafts as well as a photo of my little miss sunshine snapped last fall.


J'ai commencé par découper les bandes qui se trouvaient en bas des feuilles 30x30 de la collection, je les ai légèrement incurvées puis placées en diagonale dans le coin supérieur gauche de la page. J'ai ensuite collé la photo sur les bandes avec de la mousse 3D pour la faire ressortir.

First, I cut the branding strips at the bottom of the Glitter Girl 12x12 papers, I folded up the edges and lined them up diagonally in the top left-hand corner of the page. Next, I placed the photo on the strips using foam squares to make it pop.


Pour le titre, j'ai utilisé un mot autocollant doré de la collection Little by Little de Shimelle ainsi que des lettres autocollantes roses Glitter Girl que j'ai placées sur une jolie découpe arc-en-ciel. J'ai ajouté quelques mots autocollants sous le titre et j'ai terminé ma page avec de jolis embellissements Glitter Girl: des autocollants, des die-cuts, des enamel dots, un bouton en bois et des sequins dorés.

For the title, I used a gold word sticker from the Shimelle Little by Little line as well as pink alpha stickers from the Glitter Girl collection that I placed on a cute rainbow die cut. I added a couple of word stickers under the title and I finsihed off my layout with pretty Glitter Girl embellies: stickers, die cuts, enamel dots, a wood button and gold sequins.


Et voici la citation de novembre!
Here is the November quote!


Si vous voulez vous aussi participer, rendez-vous dans le groupe Facebook de Paper Issues! Merci d'être passé par ici et bonne journée!

If you want to play along too, head over to the Paper Issues Facebook group! Thanks so much for stopping by today! Have a great day!


Elodie


samedi 4 novembre 2017

Paper Issues Fall Crop Layouts


Bonjour!

J'ai quelques pages à partager aujourd'hui réalisées pour la Fall Crop de Paper Issues qui avait lieu le weekend dernier dans le groupe Facebook Paper Issues Friends and Fans. Les voici!

Hi friends!

I'd like to share a couple of layouts with you today. I played along with the Paper Issues Fall Crop that was up last weekend in the Paper Issues Facebook group. Here they are!


Bewitched


Pour cette page, je me suis inspirée du Black, White & Wild All Over challenge pour lequel il fallait associer une photo en noir et blanc avec des papiers et des embellissements colorés. J'ai utilisé la belle collection Turn the Page de Paige Evans & Pink Paislee ainsi qu'une photo de mes petites sorcières prêtes à aller jeter des sorts à Halloween. J'ai cousu un grand cercle noir sur le papier de fond et je l'ai orné de jolies fleurs de la collection, de die-cuts, d'autocollants, d'étoiles, de thickers pour le titre et d'un badge Feed Your Craft.

This page was inspired by the Black, White & Wild All Over challenge which was about using a black and white photo with colorful papers and embellies. I used the beautiful Turn the Page line by Paige Evans & Pink Paislee along with a cute pic of my little witches ready to go trick or treating on Halloween. I handstitched a big black circle on the background paper and adorned it with pretty Turn the Page flowers, die cuts, stickers, dangling stars, thickers for the title and a Feed Your Craft flair badge.


Love You


Voici la page que j'ai faite pour le Leaf Me Alone challenge pour lequel il fallait créer un projet avec des feuilles. J'ai utilisé la jolie collection Cedar Lane de Pink Paislee et une photo prise lors d'une balade en octobre 2016. J'ai dessiné et découpé des feuilles dans différents papiers du paper pad, je les ai pliées légèrement et collées sur un cardstock blanc en format A4. J'ai placé la photo en bas de la page avec de la mousse 3D, j'ai ajouté des fleurs découpées dans un papier de la collection, des découpes en acétate, de la twine ainsi que des sequins et j'ai terminé avec des gouttes d'encre dorée.

Here is my take on the Leaf Me Alone challenge which was about using leaves on a project. I played with the pretty Cedar Lane collection by Pink Paislee and a photo snapped in October 2016. I drew and cut leaves in different Cedar Lane 6x6 papers, I folded them a little bit and placed them on a 8.5x11 white cardstock sheet. I adhered the pic at the bottom of the page with foam squares, I added fussy cut flowers, acetate die cuts, twine as well as sequins and I finished off my layout with droplets of gold ink.


The Good Life


J'ai réalisé cette page pour le Put It On An Angle challenge pour lequel il fallait faire une mise en page de biais. J'ai utilisé la collection Oh My Heart de Paige Evans & Pink Paislee ainsi qu'une photo prise lors d'une balade sur la plage. J'ai réalisé une grande bannière avec des feuilles du paper pad Oh My Heart et une bande découpée dans une feuille 30x30. Je l'ai décorée avec des die-cuts et des autocollants de la collection et j'ai ajouté des puffy stickers pour le titre et quelques sequins noirs.

I made this page for the Put It On An Angle challenge which was about creating a project that is on an angle. I used the colorful Oh My Heart collection by Paige Evans & Pink Paislee as well as a pic snapped during a walk on the beach a few years back. I created a large banner across the page with Oh My Heart 6x6 papers and fussy cut scallops. I embellished it with die cuts and stickers from the range and finally added puffy stickers for the title and black sequins.


Merci beaucoup de vous être arrêté par ici! Je vous souhaite un très bon weekend!
Thanks so much for joining me today! Have a great weekend!


Elodie


vendredi 3 novembre 2017

Hello Cards - Cocoa Vanilla Studio


Bonjour à tous!

J'espère que vous avez passé une bonne semaine! Vous pouvez me retrouver aujourd'hui sur le blog de Cocoa Vanilla Studio avec un set de cartes réalisé avec la superbe collection Bohemian Dream. Je suis sous le charme de ses couleurs et de ses motifs. Tout simplement magnifique!

Hello everyone!

Happy Friday! I hope you had a great week! I'm up on the Cocoa Vanilla Studio blog today with a brand new project. I played again with the gorgeous Bohemian Dream collection and, this time, I made a set of cards. I am in love with its soft and dreamy colors and patterns! So beautiful!


Pour la base, j'ai choisi deux feuilles colorées du paper pad et je les ai pliées en deux. J'ai déjà dit que j'étais fan du paper pad Bohemian Dream?! Il est tellement pratique pour la confection de cartes!

For the base, I picked two colorful papers from the 6x6 pad and folded them in half. Did I mention I was super excited about the Bohemian Dream paper pad?! It's just perfect for card making!


Je suis ensuite passée à ma partie préférée: la superposition de papiers et d'embellissements! J'ai découpé des rectangles dans deux autres feuilles du paper pad, j'ai cousu les bords avec du fil blanc pour plus de texture et de détails et je les ai placés sur le dessus de mes cartes.

Next, I moved on to my favorite part: making pretty layers! I cut rectangles in two other 6x6 papers, stitched the borders with white thread for added texture and detail and placed them on the top of my cards.


J'ai également ajouté de jolis embellissements de la collection: des die-cuts, des autocollants en chipboard, des découpes en calque et des mots autocollants. J'adore ces découpes en calque et la douceur qu'elles apportent!

I also added some pretty embellies from the range: die cuts, chipboard stickers, vellum accents and word stickers from the accessory sticker sheet. These vellum accents have my heart: I just love the soft and delicate touch they bring!


Pour les titres, j'ai utilisé un mot en chipboard et le tampon 'hello' sur une des cartes et une jolie bannière de l'ephemera pack sur l'autre. J'ai apporté la touche finale à mes cartes avec des enamel shapes bleus et mauves.

For the sentiments, I used a chipboard word combined with the 'hello' stamp from the pretty Bohemian Dream stamp set on one of the cards and a cute banner from the ephemera pack on the other one. I put the finishing touch to my cards with blue and purple enamel shapes.


Cette collection est tout simplement sublime et vous pouvez maintenant la retrouver dans la boutique en ligne de Cocoa Vanilla Studio. Merci d'être passé par ici et à bientôt!

This collection is simply amazing and I hope these cards inspire you to create with it! It is now available in the CVS online store. Thank you for stopping by! Have a wonderful day!


Elodie