mercredi 28 mars 2018

Shine - Pink Paislee


Bonjour!

Je suis de retour avec une nouvelle page que vous pouvez retrouver aujourd'hui sur le blog de Pink Paislee. Je me suis à nouveau amusée avec la belle collection Confetti Wishes et j'ai décidé cette fois de faire une page estivale avec une photo de ma fille aînée sur la plage l'été dernier. Avec ses fleurs tropicales, ses jolis oiseaux et ses couleurs vives, cette collection se prête vraiment bien aux projets liés à l'été et aux vacances!

Hi there!

I'm back with a new layout that is up today on the Pink Paislee blog. I played again with the beautiful Confetti Wishes collection and made a summery page using a photo of my oldest daughter on the beach last July. With its pretty tropical flowers, cute birds and bright colors, the Confetti Wishes line is also great for projects related to summer and vacation!


Pour le fond, j'ai choisi le joli papier 05 pour aller avec le rose de ma photo et aussi parce que j'adore le rose! Je n'avais pas d'idée précise en tête avant de commencer ma page. J'avais juste envie de faire de jolies superpositions et j'ai décidé de créer deux clusters sur ma page.

For the background, I went with the pretty Paper 05 to echo the pink on my photo and also because I love pink! I didn't have a precise design in mind before getting started . I just felt like making pretty layers and decided to create two clusters on my page.


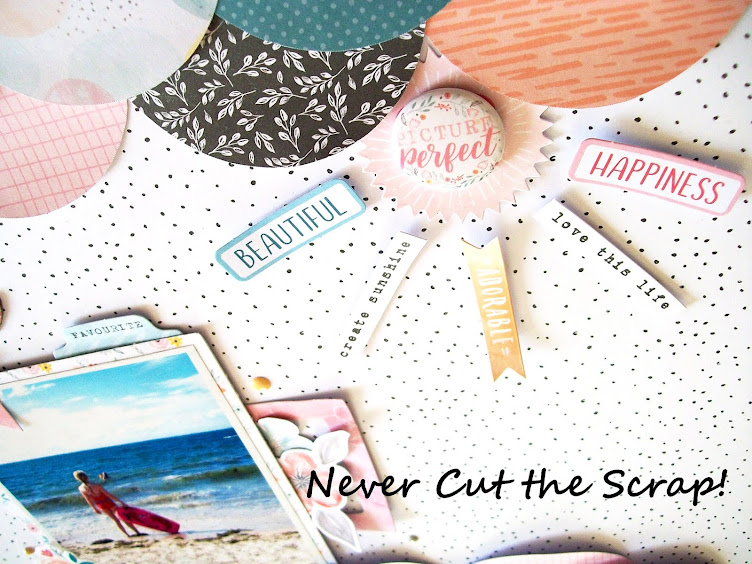
J'ai commencé par le bas de la page en superposant plusieurs papiers colorés du paper pad dans le coin inférieur gauche. J'ai matté la photo avec une autre feuille du paper pad et je l'ai collée sur mes couches de papiers avec des carrés de mousse 3D.

I started with the bottom cluster and layered colorful papers from the 6x6 pad on the bottom left-hand corner of the page. I matted the photo with another 6x6 paper and adhered it on top of my paper layers with foam squares.


J'ai glissé un napperon et quelques embellissements de la collection sous la photo: un autocollant du sticker book, un cadre orné d'un toucan et quelques die-cuts. J'ai complété mon cluster avec un perroquet, une feuille, des ballons et des fleurs de l'ephemera pack ainsi qu'avec des autocollants en chipboard. J'ai également inséré un autre cadre sous mes couches de papier.

I tucked a doily from my stash and a couple of pretty Confetti Wishes embellies under the pic: a sticker from the sticker book, a fun toucan frame and a few more die cuts. I completed my photo cluster by adding a cute parrot, a leaf, balloons and flowers from the ephemera pack, as well as chipboard stickers. I also tucked another lovely frame under my paper layers.


Je suis ensuite passée au cluster du haut et j'ai placé un cadre, un autre perroquet et quelques découpes de l'ephemera pack dans le coin supérieur gauche de la page. J'ai également ajouté une fleur en chipboard et de jolis Thickers dorés pour le titre.

Next, I moved on to the top cluster and placed a frame, another parrot and a few more ephemera pieces on the top right-hand corner of the page. I also added a cute chipboard flower and beautiful gold Thickers for the title.


J'ai terminé ma page estivale en ajoutant quelques dots dorés du Thickers pack ici et là. J'aime beaucoup la touche scintillante qu'ils apportent!

To finish my summer layout, I scattered some pretty gold dots from the Thickers pack on my page. I love the shiny touch they bring!


J'ai adoré m'amuser avec cette collection qui s'accorde particulièrement bien avec les photos estivales. J'espère que ma page vous donnera envie de l'utiliser vous aussi sur vos projets d'été! Merci beaucoup d'être passé et à très bientôt!

I had so much fun putting this page together! The Confetti Wishes collection works really well with summer photos and I hope my layout inspires you to use it on your vacation projects too! Thank you so much for joining me today! Have a great day!


Elodie


vendredi 23 mars 2018

Life Is Good - Paper Issues


Bonjour à tous!

Je termine la semaine avec une page que vous pouvez retrouver aujourd'hui sur le blog de Paper Issues. Je l'ai réalisée pour l'un des Scraplift Sunday challenges et j'ai lifté une jolie page de Rachel O'Neal avec la belle collection Pick-Me-Up de Paige Evans & Pink Paislee ainsi qu'une photo de ma fille aînée prise lors d'un voyage en Californie il y a quelques années.

Happy Friday, friends!

I'm finishing the week with a new layout that is up today on the Paper Issues blog. I played along with one of the March Scraplift Sunday challenges and lifted a pretty page by Rachel O'Neal. I used the brand new Pick-Me-Up collection by Paige Evans and Pink Paislee as well as a photo of my oldest girl snapped during our trip around California a couple of years ago. Here is my lift!


Et voici la belle page de Rachel!
And here is Rachel's beautiful page!


En passant en revue la collection Pick-Me-Up, je suis tombée sur les swatch books et j'ai décidé d'utiliser des carrés au lieu de cercles comme Rachel.  J'ai choisi le papier 3 pour le fond et j'y ai placé des cartes provenant des deux mini paper pads.

As I was looking through my Pick-Me-Up goodies, I came across the cute swatch books and decided to go with squares instead of circles like Rachel. I placed several cards from both mini pads on Paper 3 that I picked for the background.


J'ai matté la photo avec une feuille du paper pad et je l'ai collée par-dessus une carte du journaling spot pack avec des carrés de mousse 3D. Je l'ai ensuite ornée de jolies fleurs découpées dans le papier 2.

I matted the photo using a paper from the 6x6 pad and adhered it on a floral card from the journaling spot pack with foam squares. I then adorned my pic with pretty fussy cut flowers from Paper 2.


J'ai ajouté d'autres carrés à ma page avec des journaling spots, un die-cut ainsi que des autocollants en chipboard et en cardstock. Pour le titre j'ai utilisé des mots en chipboard et des Thickers que j'ai placés sur une découpe du journaling spot pack juste en dessous de la photo. J'ai terminé ma page en ajoutant quelques bandes de journaling sur un de mes carrés. J'aime beaucoup la manière dont tous les éléments ressortent avec le fond sombre!

I added more squares to my page using journaling spots, a die cut as well as chipboard and cardstock stickers. For the title, I used chipboard words and colorful Thickers that I placed on a cute journaling spot under the photo. I finished my layout by adding typed journaling strips on one of my paper squares. I love how everything pops against the dark background!


Vous pouvez trouver la belle collection Pick-Me-Up, ainsi que de nombreuses autres nouveautés, dans la boutique Paper Issues. Et rejoignez-nous dans le groupe Facebook de Paper Issues pour partager vos lifts et participer aux autres challenges de mars! Merci de votre visite et à bientôt!

You can find pretty Pick-Me-Up goodies, along with a lot of new supplies, in the Paper Issues store. And be sure to join us in the Paper Issues Facebook group to share your lifts and play along with more fun challenges! Thank you for stopping by today! Have a lovely day!


Elodie


mardi 20 mars 2018

Hooray - Pink Paislee


Bonjour!

Je suis de retour avec une nouvelle page que vous pouvez retrouver aujourd'hui sur le blog de Pink Paislee. Ces deux prochaines semaines, nous allons mettre l'accent sur la toute nouvelle collection Confetti Wishes. Avec ses couleurs vives et ses motifs festifs, elle est parfaite pour les projets d'anniversaire et de fête. Fun et colorée à souhait! Pour ma page, j'ai utilisé une photo de ma fille aînée le jour de son dixième anniversaire en juillet dernier.

Hello!

I'm back with a new layout that is up today on the Pink Paislee blog. We'll be putting the spotlight on the brand new Confetti Wishes collection over the next two weeks. With its bold colors and festive patterns, it's perfect for birthday and party-themed projects. So colorful and fun! I made a birthday page using a photo of my oldest daughter on her 10th birthday last July.


J'ai commencé avec le fond en coupant un grand carré dans le papier 03. J'ai cousu les bords avec du fil noir et je l'ai placé sur le joli papier 07 avec ses bandes colorées. Je suis ensuite partie sur l'idée de faire un cœur avec les washi stickers de la collection.

I started by working on the background and cut a large square in Paper 03.I hand stitched the edges with black thread and backed it with the colorful Paper 07. I wanted to create my own background design using the vibrant Confetti Wishes washi stickers and went with a heart.


J'ai placé des bandes de washi de différentes tailles sur mon carré central de manière à former un cœur. J'ai ensuite matté la photo avec une feuille du paper pad et je l'ai collée au centre de mon cœur en washi avec de la mousse 3D pour la faire ressortir.

I placed washi strips in different sizes on the background so as to make a heart. I matted the photo with a paper from the 6x6 pad and adhered it in the center of my washi heart with foam squares to make it pop a bit more.


Je suis ensuite passée à la partie embellissement! J'ai glissé quelques die-cuts et un onglet autocollant sous la photo et je l'ai ornée d'un cœur doré du Thickers pack et de chiffres autocollants. J'ai complété mon cœur en washi avec quelques autocollants en chipboard et un sticker du sticker book.

Next came the embellishing! I made a cluster around the picture using pretty leaves, flowers and a cute stamp from the ephemera pack, as well as a tab sticker that I tucked under the photo. I also adorned my pic with a gold heart sticker from the Thickers pack that I topped with puffy sticker numbers. I completed my washi heart by adding a couple of chipboard stickers and a cardstock sticker from the sticker book.


J'avais l'impression qu'il manquait encore quelque chose à ma page. J'ai finalement eu l'idée d'ajouter une bordure entre le carré central et le papier de fond avec des cercles découpés dans plusieurs feuilles du paper pad. Enfin, j'ai apporté une touche scintillante à ma page d'anniversaire avec de jolis Thickers dorés.

At that point, I felt like something was missing between the middle square and the stripy background paper. I finally came up with the idea of a scalloped border using circles that I cut from several 6x6 papers and that I tucked under the middle paper. Finally, I added a bit of shine to my birthday page with pretty gold Thickers.


J'ai adoré faire cette page festive et j'espère qu'elle vous donnera envie de vous amuser avec cette belle collection! Merci d'être passé par ici et à très bientôt!

I had a lot of fun making this festive layout and I hope it inspires you to play with this beautiful collection! Thanks so much for visiting today! Have a fantastic day!


Elodie


samedi 17 mars 2018

So Adorable - Cocoa Vanilla Studio


Bonjour!

Je suis de retour avec une page que vous pouvez retrouver aujourd'hui sur le blog de Cocoa Vanilla Studio. Cette semaine est placée sous le thème du scraplift et j'ai lifté une magnifique page de la gentille et talentueuse Amanda-jayne Baldwin. J'aime le côté doux et rêveur de sa page avec les jolies couleurs de la collection Bohemian Dream! Pour ma page, j'ai utilisé la belle collection More than Words et une photo des filles à la patinoire en décembre dernier. Voici mon lift!

Hi!

I'm back with a new layout that is up today on the Cocoa Vanilla Studio blog. It's all about scraplift this week and I lifted a stunning page by the sweet and talented Amanda-jayne Baldwin. I love how bright and dreamy her layout looks with those pretty Bohemian Dream colors and supplies! For my page, I used the beautiful More than Words collection along with a photo of the girls ready to go ice skating last December. Here is my lift!


Et voici la superbe page d'Amanda!
And here is Amanda's gorgeous layout!


J'ai pris une direction différente pour le fond en utilisant des papiers à motif et non du cardstock et du mixed media comme Amanda. J'ai placé deux bandes découpées dans la jolie feuille Gossamer et je les ai placées de chaque côté du papier Precious, comme sur la page d'Amanda. J'ai coupé deux autres bandes dans les papiers Collage et Noteworthy et je les ai collées à droite de la page. J'ai recourbé les bords avant de les coller pour apporter du relief. J'aime beaucoup ces deux bandes noires qui viennent joliment encadrer la page!

I went in a different direction for the background and used patterned papers instead of cardstock and mixed media like Amanda. I placed two stips from the pretty Gossamer sheet on each side of the Precious paper, just like on Amanda's layout. I cut two more strips in the Collage and Noteworthy papers and I adhered them on the right-hand side of the page. I folded up the edges a bit before sticking the strips down to give more dimension to my layout. I like how the black strips nicely frame the page!


J'ai commencé par le cluster du haut en glissant deux onglets de l'ephemera pack sous la bande de papier. J'ai ensuite ajouté quelques jolis embellissements de la collection: un mot autocollant, un die-cut rond que j'ai surmonté d'un beau papillon en calque ainsi qu'un autre papillon de l'ephemera pack.

I started with the top left cluster and tucked two tabs from the ephemera pack under the strip. I then added a couple of pretty More than Words embellies: a word sticker from the accessory sticker sheet, a circular die cut that I topped with a beautiful vellum butterfly and another butterfly from the ephemera pack.


Je me suis ensuite occupée du côté droit en collant la photo avec des carrés de mousse 3D. J'ai placé un joli cadre de l'ephemera pack sur ma photo et je l'ai orné d'un papillon et d'une bannière pour le titre.

Next, I moved on to the right side of the page and adhered the photo with foam squares. I placed a lovely frame from the ephemera pack on my pic and adorned it with a butterfly and a banner for the title.


J'ai inséré un autocollant rond sous la photo et je l'ai surmonté d'un badge. J'ai également ajouté de jolies plumes, un beau cerf en chipboard ainsi qu'un cœur autocollant que j'ai placés sous la photo. J'aime beaucoup ces éléments noirs associés aux couleurs plus douces!

I tucked a circular sticker under the picture and topped it with a cute flair button. I completed my photo cluster with cardstock feathers, a pretty deer chipboard sticker and a chipboard heart that I placed under the pic. I just love all the black bits combined with those beautiful pastel colors!


J'ai fini d'embellir le côté droit de ma page avec d'autres jolies découpes, un papillon du vellum accent pack et quelques mots autocollants. Il fallait vraiment que j'utilise l'autocollant "so dear to me" pour aller avec le cerf en chipboard que j'ai placé sous la photo! J'ai apporté la touche finale à ma page avec quelques enamel dots.

I finished embellishing the right side of my page with more pretty die cuts, a butterfly from the vellum accent pack and a couple of word stickers. I just had to use the "so dear to me" sticker to go with the deer chipboard piece that I placed under the pic! I put the final touch to my layout with pastel enamel dots.


J'ai adoré lifté cette belle page d'Amanda et j'espère lui avoir fait honneur! Merci beaucoup de votre visite et bon weekend!

I loved lifting Amanda's beautiful page and I hope I did it justice! Thank you so much for stopping by today! Wishing you a great weekend!


Elodie


vendredi 16 mars 2018

Delight In Every Moment - Paper Issues


Bonjour à tous!

J'espère que vous avez passé une bonne semaine! J'ai une nouvelle page à partager avec vous aujourd'hui. Je l'ai réalisée pour le Put it on an Angle challenge de Paper Issues pour lequel il faut créer un projet de biais. J'ai utilisé la belle collection Chasing Dreams de Maggie Holmes et Crate Paper ainsi qu'une photo de ma petite dernière prise à Tarragone en Espagne il y a deux ans.

Hi friends!

I hope you had a great week! I'm popping in today to share a new layout with you. I made it for the Paper Issues Put it on an Angle challenge that is all about creating a project that is on an angle. For my page, I used the pretty Chasing Dreams collection by Maggie Holmes and Crate Paper as well as a photo of my youngest girl snapped in Tarragona two years ago.


Tout d'abord, j'ai superposé plusieurs feuilles du paper pad ainsi qu'un napperon dans le coin supérieur gauche de la page. J'ai matté la photo avec une autre feuille du paper pad et je l'ai collée sur mes couches de papiers à l'aide de mousse 3D. J'ai ensuite ajouté quelques embellissements autour de la photo: des découpes de l'ephemera pack, des autocollants, un cadre découpé dans une feuille du paper pad et quelques boutons en bois Artemio.

I started by layering several papers from the 6x6 pad and a doily from my stash on the top left-hand corner of the page. I matted the photo using another 6x6 paper and adhered it on my paper layers with foam squares.I completed my photo cluster with pretty Chasing Dreams embellies: a couple of ephemera pieces, cardstock and puffy stickers, a frame that I cut in a 6x6 paper and cute Artemio wood buttons.


Pour le titre, j'ai utilisé un autocollant de la collection et je l'ai collé de biais dans le coin inférieur droit de la page avec des carrés de mousse 3D pour le faire ressortir. J'ai apporté la touche finale avec quelques gouttes d'encre et des enamel dots roses.

For the title, I used another sticker that I adhered on the bottom right-hand corner of the page with foam squares to make it pop. I put the final touch to my layout with pink enamel dots from my stash and droplets of black ink.


Rendez-vous dans le groupe Facebook Paper Issues Friends and Fans pour participer et retrouver tous les autres challenges de mars! Vous aurez peut-être la chance de gagner un bon d'achat à valoir dans la boutique Paper Issues. Merci de vous être joint à moi et à très vite!

Hop over to the Paper Issues Friends and Fans Facebook group to play along and take a look at all the fun March challenges! You could win a gift card to the Paper Issues store! Thank you for joining me today! Have a lovely day!


Elodie


vendredi 9 mars 2018

Girl Gang - Pink Paislee


Bonjour!

Je suis de retour avec une nouvelle page que vous pouvez retrouver aujourd'hui sur le blog de Pink Paislee. Cette semaine, nous mettons l'amitié à l'honneur. Pour ma page, j'ai utilisé la très jolie collection Wild Child ainsi qu'une photo des filles en route pour partager de nouvelles aventures ensemble. Voici ma page!

Hello!

It's all about friendship this week on the Pink Paislee blog! I'm sharing this sweet page today using the super pretty Wild Child collection and a photo of my girls off for new adventures together. Here is my layout!


J'adore utiliser des papiers à motif pour mes fonds. Je trouve que c'est un bon moyen d'ajouter du détail et de la couleur à mes projets. Ici, j'ai décidé d'utiliser deux papiers en mélangeant les belles couleurs et les motifs des feuilles 03 et 04. J'ai coupé un grand carré dans le papier 04, j'ai cousu les bords à la main avec du fil bleu foncé et je l'ai placé à droite du papier 03. Ces couleurs vont vraiment bien avec ma photo!

I like using patterned paper for my backgrounds. I think it's a great way to add detail and color to my projects. Here, I went with two papers and mixed the beautiful colors and patterns of Papers 03 and 04. I cut a large square in Paper 04, hand stitched the edges with dark blue thread and placed it on the right-hand side of Paper 03. These colors go so well with my photo!


J'ai matté la photo avec deux jolis papiers du paper pad et je l'ai collée dans le coin supérieur gauche de la page avec des carrés de mousse 3D pour la faire ressortir. J'ai également glissé un onglet sur lequel j'ai tamponné la date sous la photo.

I matted the pic with two pretty papers from the 6x6 paper pad and I adhered it on the top left-hand corner of the page with foam squares to make it pop. I also tucked a tab on which I stamped the date under the photo.


Pour aller avec ma photo et cette jolie collection, je suis partie sur un design fun en décidant de placer tous les embellissements sur les bords du papier à rayures. Je craque pour les embellissements de cette collection: ils sont colorés et mignons à souhait!

This sweet photo and this cute collection called for a fun design! So I decided to place the embellies all along the stitched border. I'm swooning over the Wild Child embellishments: they're just so colorful and cute!


J'ai utilisé des thickers pour le titre ainsi que des puffy stickers et des die-cuts que j'ai collés avec de la mousse 3D pour apporter du relief à ma page. J'ai orné le titre de cœurs en chipboard et j'ai terminé ma page en ajoutant de jolies étoiles de la feuille de rub-ons.

I used Thickers for the title as well as puffy stickers and die cuts that I adhered with foam squares to add dimension to my page. I adorned the title with bright chipboard hearts and I finished my layout by adding cute rub-on stars.


J'espère que cette page vous donnera envie de mélanger motifs et couleurs et de vous amuser avec la belle collection Wild Child! Merci de votre visite et bon weekend!

I hope this page inspires you to go wild with patterns and colors and to have fun with the beautiful Wild Child collection! Thank you for joining me today! Have a beautiful day!


Elodie


samedi 3 mars 2018

Picture Perfect - Cocoa Vanilla Studio


Bonjour à tous!

C'est à mon tour de partager un nouveau projet sur le blog de Cocoa Vanilla Studio! En attendant le retour des beaux jours, j'ai fait une page estivale avec la superbe collection More than Words et une photo prise à la plage en juillet dernier.

Hi everyone!

It's my turn to share a new project on the Cocoa Vanilla Studio blog today! I had a lot of fun making this summery page using the gorgeous More than Words collection and a photo snapped on the beach last July. It's pretty cold here in France and I'm so looking forward to warmer days and sunshine!


Pour aller avec ma photo, je suis partie sur l'idée d'un paysage en utilisant des demi-cercles pour le ciel et la mer. Tout d'abord, j'ai choisi le beau papier Radiant, avec ses pois noirs sur fond blanc, pour le fond afin que ma photo et les demi-cercles ressortent encore mieux.

To go with my photo, I decided to create a scene on my page using half circles for the sea and the sky. To start with, I picked the black and white side of the beautiful Radiant paper for the background to make my bright pic and the colorful half circles pop.


J'ai dessiné puis découpé des cercles dans quelques feuilles du paper pad, je les ai à nouveau coupés en deux et je les ai placés comme des tuiles en haut et en bas de la page. J'ai recourbé les bords avant de les coller pour apporter du volume à la page.

I drew and cut several circles in pretty papers from the 6x6 pad, cut them again in half and placed them like scallops at the top and at the bottom of the page. I folded up the edges a bit before sticking them down to add dimension to my page.


J'ai matté la photo avec un joli papier floral du paper pad et je l'ai glissée dans ma mer en papier en bas de la page. J'ai ensuite ajouté de beaux embellissements de la collection sur et autour de la photo: des découpes en calque, des die-cuts, un onglet autocollant, des cœurs en chipboard, des enamel dots et un cadre de l'ephemera pack que j'ai placé sous la photo.

I matted the photo with a lovely floral paper from the 6x6 pad and tucked it in my paper sea at the bottom of the page. Then I completed my photo cluster with beautiful vellum accents, die cuts, a tab sticker, cute chipboard hearts, enamel dots and a frame that I placed under the pic.


Il fallait que j'ajoute un soleil à ma scène estivale! J'ai donc glissé un des autocollants de la feuille d'accessory stickers sous les cercles du haut et je l'ai surmonté d'un joli badge. J'adore ces badges! Ils sont parfaits pour apporter du relief et de la texture à un projet! Ici, je l'ai aussi utilisé pour le titre de ma page.

I just had to add a sun to my summer scene! So I tucked a round sticker from the accessory sticker sheet under the scallops at the top of the page and I topped it with a pretty flair button. I just love those flair buttons! I've been using them on all my More than Words projects so far. They're great to add dimension and texture. Here, I also used it as my title.


Enfin, j'ai apporté la touche finale à mon soleil et à ma page en ajoutant des die-cuts et des mots autocollants en guise de rayons.

Finally, I put the finishing touch to my sun and to my page by adding die cuts and word stickers to make the sunbeams.


J'espère que ma page vous donnera envie de vous amuser avec cette magnifique collection! Vous pouvez maintenant la retrouver dans la boutique de Cocoa Vanilla Studio! Merci de votre attention et bon weekend!

I hope this layout inspires you to have fun with the beautiful More than Words collection! It is now available in the Cocoa Vanilla Studio shop! Thank you for visiting my blog today! Have a fantastic weekend!


Elodie


vendredi 2 mars 2018

Love You - Pink Paislee


Je suis déjà de retour avec une page que vous pouvez retrouver aujourd'hui sur le blog de Pink Paislee! Pour cette page, j'ai utilisé la superbe collection Pick-Me-Up, une photo des filles prise en Irlande l'été dernier et quelques petites choses que j'adore: du rose, des fleurs et de la couture!

Hi again! I'm already back with another page that is up today on the Pink Paislee blog! This one showcases some of my scrappy favorites: pink, flowers and hand stitching. I played again with the gorgeous Pick-Me-Up collection and a photo of my girls snapped in Ireland last summer.


J'ai joué avec mes ciseaux de précision pour cette page en découpant de jolies fleurs dans le papier 02. Je suis partie sur l'idée d'une couronne et j'ai placé mes fleurs en cercle sur la page. J'ai choisi le beau papier 16 pour le fond. Je vous ai déjà dit que j'adore le rose?!

I played with my craft scissors for this one and fussy cut beautiful flowers from Paper 02. I decided to go for a wreath design and placed my flowers in a cirlce on the page. I picked the pretty Paper 16 for the background. Did I mention that I love pink?!


J'ai collé la photo dans la couronne avec de la mousse 3D par dessus un cadre de l'ephemera pack et quelques journaling spots. J'ai également ajouté un onglet sur lequel j'ai tamponné la date. J'aime beaucoup la façon dont la photo ressort avec les couleurs vives de la collection!

I adhered the pic in the wreath with foam squares and tucked a colorful frame from the ephemera pack, a tab with the date, and a couple of journaling spots under it. I love how the black and white photo pops against the bright Pick-Me-Up colors!


J'adore créer des ornements qui donnent l'impression de pendre de mes pages. Ici, j'ai cousu des lignes qui descendent de la couronne avec du fil bleu fonçé et je les ai ornés de boutons et d'autocollants de la collection. J'ai ajouté des Thickers colorés au bout de mes lignes et j'ai complété le titre avec un autocollant en chipboard que j'ai placé sous la photo.

Another scrappy fave of mine is to create dangling ornaments on my pages. Here, I hand stitched lines using dark blue thread and I adorned them with pretty Pick-Me-Up embellies: buttons from the haberdashery pack as well as chipboard and puffy stickers. I added colorful Thickers at the end of my stitched lines and completed the title with a chipboard sticker that I placed under the photo.


J'ai apporté la touche finale à ma page en ajoutant de beaux embellissements de la collection sur et autour de ma couronne de fleurs: un joli bouton en forme de papillon, des mots autocollants, un nœud de l'ephemera pack que j'ai agrémenté d'un bouton autocollant ainsi que des puffy stickers et des autocollants en chipboard.

I put the final touch to my girly layout by adding beautiful Pick-Me-Up embellishments on and around the wreath: a cute butterfly button from the haberdashery pack, word stickers from the cardstock sticker sheet, a paper bow that I topped with a button sticker, as well as chipboard and puffy stickers.


J'aime beaucoup utiliser ce genre de design sur mes pages: simple, efficace et tellement joli! J'espère que ma page vous donnera envie de jouer avec vos ciseaux et la belle collection Pick-Me-Up! Merci de vous être joint à moi aujourd'hui et à très bientôt!

You can never go wrong with a wreath design: they always look so pretty! I hope my layout inspires you to play with your scissors and the beautiful Pick-Me-Up collection! Thank you for joining me today! Wishing you a lovely day!


Elodie


Hello Love - Paper Issues


Bonjour!

J'espère que vous avez passé une excellente semaine! Vous pouvez me retrouver aujourd'hui sur le blog de Paper Issues avec une nouvelle page réalisée pour le PI Partners Up challenge de mars. Ce mois-ci, Paper Issues s'est associé avec Stuck Sketches. J'ai donc fait une page inspirée du sketch de Laura Whitaker avec la collection Glitter Girl de Shimelle et American Crafts ainsi que des photos de ma petite dernière en route pour de nouvelles aventures sur sa trotinette.

Hello!

I hope you had a great week! I'm up on the Paper Issues blog today with a new layout that I made for the March PI Partners Up challenge. This month, Paper Issues is partnering with Stuck Sketches. I played along and made a page based on the pretty sketch created by Laura Whitaker using the Shimelle Glitter Girl collection and pics of my little one off for new adventures on her scooter.


Voici ma page!
Here is my page!


Et voici le sketch!
And here is the sketch!


Pour commencer, j'ai découpé trois cercles de tailles différentes dans les papiers Work Hard, Countdown et Think Pink. J'ai cousu les bords du cercle le plus petit avec du fil blanc pour plus de détails et de texture. J'ai ajouté ma touche personnelle au fond en collant des bandes de papier à motif en bas de la page. J'adore la touche colorée et originale qu'elles apportent!

To start with, I cut three circles in the Work Hard, Countdown and Think Pink papers. I hand stitched the littlest one with white thread to add detail and texture to my layout. I spiced up the white background by adding patterned paper strips at the bottom of the page. I like the colorful and fun touch they bring!


J'ai ensuite superposé les cercles au centre de la page et j'ai collé les photos avec de la mousse 3D pour les faire ressortir. Je suis ensuite passée à la partie embellissement. J'ai glissé des napperons et une découpe de la collection sous les photos et j'ai utilisé d'autres die-cuts pour le titre.

Next, I layered the circles in the center of the page and I adhered the matted pics with foam squares to make them pop. I then moved on to the embellishing part. I tucked doilies from my stash and a Glitter Girl die cut under the photos and I used more ephemera pieces for the title.


J'ai orné mes cercles de jolis autocollants et de bandes de washi du sticker book Glitter Girl et j'ai placé une découpe holographique de l'ephemera pack en haut de la page. J'ai apporté la touche finale avec des enamel dots, des boutons en bois et des sequins du mixed embellishment pack.

I adorned my circles with pretty stickers and washi strips from the Glitter Girl sticker book and I added a cute lenticular shape from the ephemera pack at the top of the page. I put the final touch to my layout with enamel dots, wood buttons and sequins from the mixed embellishment pack.


Vous pouvez trouver tous les détails de ce challenge sur le blog de Stuck Sketches. Et retrouvez-nous dans le groupe Facebook Paper Issues Friends and Fans pour partager vos pages inspirées du sketch et tenter de gagner un bon d'achat à valoir dans la boutique Paper Issues! Merci de votre visite!

You can find more details about this challenge on the Stuck Sketches blog. And be sure to join us in the Paper Issues Friends and Fans Facebook group to share your takes on the sketch and get a chance to win a gift card to the Paper Issues store! Thanks so much for stopping by!


Elodie