lundi 23 novembre 2020

Say Cheese Layout


Hi there!

I hope you are doing well. I'm starting off the week with a new layout I made with the Paige Evans Go the Scenic Route collection and a sweet photo of my little one in New Orleans last year.

Bonjour!

J'espère que vous allez bien. Je commence la semaine avec une toute nouvelle page que j'ai faite avec la collection Go the Scenic Route de Paige Evans et une photo de ma petite dernière en pleine pause gourmande à la Nouvelle Orléans l'année dernière.


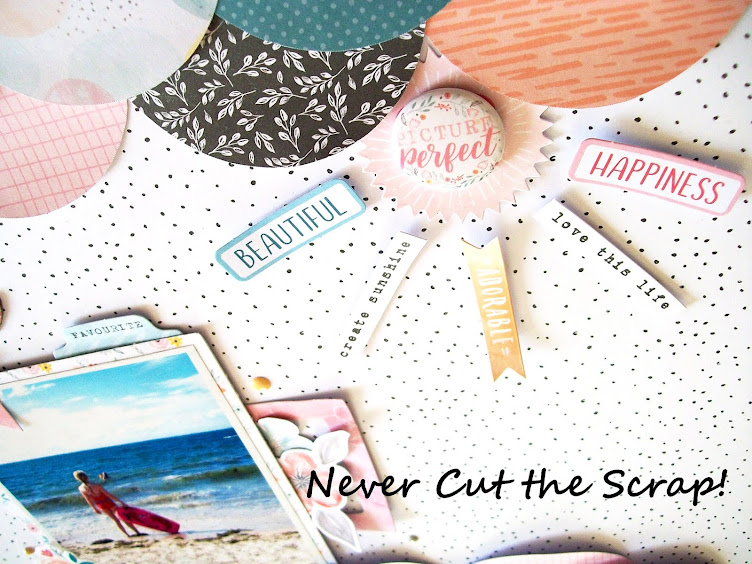
I went with a fun design and decided to place colorful Go the Scenic Route embellies all around the page. I chose the bright Paper 3 for the background and started to arrange ephemera pieces and fussy cut flowers on the borders of my layout.

Je suis partie sur une mise en page tape-à-l'œil en me concentrant sur les bords de la page. J'ai choisi le joli papier 3 pour le fond et j'ai placé des fleurs découpées dans le papier 18 et des die-cuts de la collection tout autour de ma page.


I backed the photo using a floral paper from the 6x8 paper pad and I adhered it at the bottom of the page with foam squares. I adorned it with flowers from the floral embellishment pack and with a couple of die cuts. For the title, I used a cardstock sticker that I placed on a tab on the left side of the picture. I also topped some of the ephemera pieces with cardstock & puffy stickers and I used Thickers from previous Paige Evans collections to add the place and the date. To finish, I sprinkled colorful puffy dots all around the page.

J'ai matté la photo à l'aide d'un papier floral du paper pad et je l'ai collée en bas de la page avec des carrés de mousse 3D. Je l'ai ensuite ornée de fleurs et de die-cuts de la collection. Pour le titre, j'ai utilisé un autocollant en cardstock que j'ai placé sur un onglet à gauche de ma photo. J'ai également surmonté quelques die-cuts d'autocollants et j'ai utilisé des Thickers de collections passées pour mentionner l'endroit et la date. J'ai terminé en ajoutant des puffy dots colorés tout autour de ma page.


I hope you are inspired to use the borders of your layouts. Thank you for joining me today! Have a great day!

J'espère que je vous ai donné envie d'utiliser les bords de vos pages. Merci de vous être joints à moi aujourd'hui! Je vous souhaite une bonne journée!


Elodie


vendredi 13 novembre 2020

Simply The Best Layout


Hi friends!

Here's a new page I made with the Marigold collection by Maggie Holmes and Crate Paper. I used it to document a selfie taken by my girls. I love getting that kind of surprises on my phone!

Bonjour à vous!

Voici une nouvelle page que j'ai réalisée avec la collection Marigold de Maggie Holmes et Crate Paper. Je l'ai associée à un selfie pris par les filles. J'adore trouver ce genre de surprises sur mon téléphone!


I wanted to use colorful paper hearts for this page. So I started by drawing and cutting a lot of them in several papers from the 6x8 paper pad. Next I looked for a background and decided to go with the Magical Moments paper to make my hearts pop. I folded them in half and opened them back up to create dimension. I then placed them in two concentric circles on the bottom left side of the page.

Pour cette page, j'avais dans l'idée d'utiliser des cœurs en papier. J'ai donc commencé par les tracer et les découper dans différentes feuilles du paper pad. J'ai ensuite cherché un fond et j'ai finalement choisi le papier Magical Moments pour bien faire ressortir les cœurs. Je les ai pliés en deux avant de les rouvrir pour créer du relief. Puis je les ai placés de manière à former deux cercles concentriques en bas de la page.


I backed the picture using another 6x8 paper and I adhered it inside the circles with foam squares. I topped it with a banner sticker for the title and I also adorned it with pretty Marigold flowers. I added more flower stickers on some of the paper hearts and I finished embellishing my layout with cute puffy heart stickers.

J'ai matté la photo à l'aide d'une feuille du paper pad et je l'ai collée à l'intérieur des cercles avec des carrés de mousse 3D. Je l'ai surmontée d'une bannière autocollante pour le titre et je l'ai également ornée de jolies fleurs de la collection. J'ai ajouté d'autres fleurs autocollantes sur quelques cœurs en papier et j'ai fini d'embellir ma page avec des cœurs autocollants dorés.


Thank you so much for visiting my blog today! Have a beautiful day!

Je vous remercie de votre visite et je vous souhaite une belle journée!


Elodie


vendredi 6 novembre 2020

Snap A Photo Layout


Hello everyone!

I have a new page to share with you today. It features pretty flowers, pink, the Paige Evans Go the Scenic Route collection and a selfie taken by my oldest girl.

Bonjour!

J'ai une nouvelle page à partager avec vous aujourd'hui. Elle met en scène de jolies fleurs, du rose, la collection Go the Scenic Route de Paige Evans et un selfie pris par ma fille aînée.


For this layout, I wanted to create a diamond frame using flowers. I started by backing the photo using a paper from the 6x8 paper pad and I placed it in the center of the page, over another pink paper from the Go the Scenic Route paper pad. Next I turned to fussy cutting lots of flowers in Paper 18. Once I finished playing with my crafting scissors, I arranged my flowers in a diamond shape on the pretty Paper 12. 

Pour cette page, j'avais envie de créer un cadre en forme de losange avec des fleurs. J'ai commencé par matter la photo avec une feuille du paper pad et je l'ai placée au centre de la page, par dessus un autre papier rose provenant du paper pad de la collection. Je me suis ensuite affairée à découper des fleurs dans le papier 18. Une fois fini avec mes ciseaux de précision, j'ai disposé mes fleurs en losange sur le joli papier 12.


I embellished the picture with a mandala die cut from the ephemera pack and I topped it with a "yes" cardstock sticker. I also placed puffy word stickers on a couple of flowers under the photo for the title and I finished adorning my floral frame with colorful puffy dots and hearts.

J'ai décoré la photo avec un mandala de l'ephemera pack et je l'ai surmonté d'un autocollant en cardstock. J'ai aussi placé des mots autocollants sur quelques fleurs pour le titre et j'ai terminé ma page en ajoutant des cœurs et des puffy dots autour du cadre.


I hope you are inspired to play with your scissors and use fussy cut items on your next layout. Thank you for stopping by! Take care!

J'espère que je vous ai donné envie de jouer avec vos ciseaux et d'utiliser des éléments découpés sur votre prochaine page. Merci de votre visite et prenez bien soin de vous!


Elodie