lundi 26 février 2018

Love You Tons - Paper Issues


Bonjour!

Je commence la semaine avec une nouvelle page réalisée avec une photo de ma petite dernière prise au Titanic Quarter de Belfast l'été dernier et avec le magnifique swag bag de février de Paper Issues. Les swag bags sont des kits remplis de jolis papiers et embellissements que vous pouvez retrouver chaque mois dans la boutique de Paper Issues. Voici celui de février!

Hi there!

I'm starting the week with a new layout that I made with a photo of my youngest girl snapped in the Titanic Quarter in Belfast last summer and with the Paper Issues February swag bag. Swag bags are monthly kits packed with pretty papers and embellies that you can find in the Paper Issues store. Here is the February one! Gorgeous, right?!


Et voici ma page!
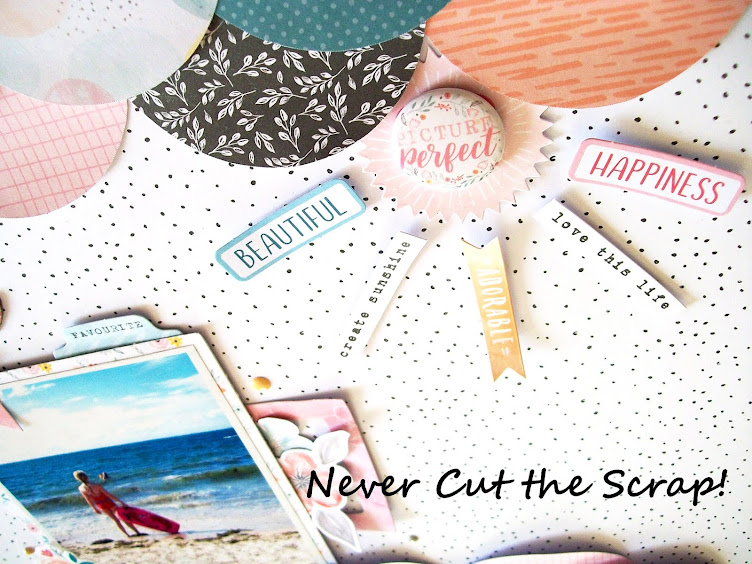
And here is my layout!


J'ai commencé par m'occuper du fond en plaçant une grosse bande de papier à motif de la collection Falala de Crate Paper en haut d'un cardstock blanc. J'ai ensuite découpé une bannière dans une des cartes du swag bag et je l'ai collée en bas du papier à motif. J'ai recourbé les bords avant de la coller pour apporter du relief à la page.

I started with the background and placed a large patterned paper strip from the Crate Paper Falala collection at the top of a white cardstock sheet. I cut a banner in one of the swag bag cards and tucked it under the Falala kraft paper. I folded up the edges a bit before sticking it down to add dimension to the page.


J'ai ensuite fait des superpositions en bas de la page avec des morceaux de papier à motif, un die-cut, un tag et une esperluette en liège. J'ai matté la photo avec une autre carte du swag bag et un napperon, je l'ai ornée d'un joli trombone oiseau et je l'ai collée avec des carrés de mousse 3D. J'ai utilisé une autre découpe du swag bag pour le titre que j'ai placée à droite de la photo. J'ai également ajouté quelques embellissements du swag bag autour de la photo: une branche, des papillons, un morceau de twine et des découpes en bois. J'ai terminé en plaçant une étoile en bois et un autre papillon en haut de la page.

Next, I made layers at the bottom of the page with patterned paper cards, an ephemera piece, a tag and a lovely cork ampersand. I matted the pic with another card from the swag bag and a doily, I adorned it with a cute bird clip and I adhered it with foam squares. I used another die cut for the title and completed my photo cluster with more pretty embellies from the swag bag: a branch die cut, butterfly buttons, some twine and wood veneer pieces. I finished my layout by adding a wood veneer star and another shiny butterfly at the top of the page.


Vous pouvez trouver le swag bag de février dans la boutique de Paper Issues avec plein d'autres nouveautés! Et rejoignez-nous dans le groupe Facebook Paper Issues Friends and Fans pour partager vos projets réalisés avec les swag bags et participer aux autres challenges de février! Merci de votre visite et à bientôt!

You can find the beautiful February swag bag in the Paper Issues store, along with a lot of pretty new supplies! And join us in the Paper Issues Friends and Fans Facebook group to share your Swag Bag projects and play along with other fun February challenges! Thank you for joining me today! Have a wonderful day!


Elodie


mardi 20 février 2018

Marvelous Girl - Pink Paislee


Bonjour à tous!

Vous pouvez me retrouver aujourd'hui sur le blog de Pink Paislee avec une page réalisée avec la toute nouvelle collection Pick-Me-Up de Paige Evans ainsi qu'une photo de ma petite dernière prise il y a quelques années. J'adore les couleurs vives et les jolis motifs de cette collection. Tout simplement magnifique! Voici ma page!

Hi friends!

I'm back on the Pink Paislee blog today with a layout using the brand new Pick-Me-Up collection by Paige Evans and a photo of my youngest girl snapped a couple of years ago. I'm swooning over the bright colors and fun patterns of this line. It's all so beautiful! Here is what I made with it!


Pour aller avec cette jolie photo de ma petite chipie, je suis partie sur un design amusant en plaçant tous mes éléments de biais sur la page. Pour le fond, j'ai choisi le papier 06 avec sa teinte douce pour que la photo et les embellissements colorés de la collection ressortent encore mieux.

To go with this cute pic of my happy girl, I went with a fun design and decided to put everything on an angle. I started by picking the soft Paper 06 for the background to make my bright photo and the colorful Pick-Me-Up embellies pop even more.


J'adore utiliser des bandes de papier à motif sur mes pages. C'est un bon moyen d'ajouter une touche de couleur et de gaieté à un projet! Ici, j'ai découpé des bandes dans les papiers 02, 06 et 21 et je les ai placées dans les coins inférieur gauche et supérieur droit de la page. J'ai recourbé les bords avant de les coller pour apporter du relief.

I love using strips of patterned paper on my layouts. It's a great way to add a playful and colorful touch to a project! Here, I cut the branding strips at the bottom of Papers 02, 06 and 21 and I placed them on the bottom left-hand and top right-hand corners of the page. I folded up the edges a bit before sticking them down for dimension.


J'ai collé ma photo au centre de la page avec des carrés de mousse 3D pour la faire ressortir et je suis passée à la partie embellissement. J'ai glissé un joli cadre de l'ephemera pack sous la photo et je l'ai orné d'un nœud surmonté d'un bouton autocollant. J'ai également ajouté des die-cuts, un onglet sur lequel j'ai tamponné la date, quelques puffy stickers et de jolis rub-ons.

I adhered my photo in the center of the page with foam squares to make it pop a bit more and moved on to the embellishing part. I tucked a pretty frame from the ephemera pack under the pic and adorned it with a cute bow that I topped with a button sticker from the puffy sticker sheet. I completed my photo cluster with bright flower die cuts, a tab from the journaling spot pack on which I stamped the date, a couple of puffy stickers and pretty rub-ons.


Pour le titre, j'ai utilisé une découpe de l'ephemera pack ainsi que des Thickers bleu marine. J'ai également surmonté le "i" d'une étoile autocollante. Tout est dans le détail! J'ai terminé ma page avec deux jolis papillons autocollants et quelques sequins de la collection.

For the title, I used a die cut and navy blue foam Thickers. I also topped the "i" with a cute star sticker from the puffy sticker sheet. It's all in the details, right?! I finished my page with a couple of shiny butterfly stickers and some sequins from the haberdashery pack.


J'adore cette collection pleine de couleurs! J'espère que ma page vous donnera envie de l'utiliser sur vos projets! Merci d'être passé par ici et à bientôt!

I love everything about this bright and beautiful collection! And it's just perfect to document photos of my little miss sunshine! I hope this layout inspires you to have fun with it! Thanks so much for stopping by! Have a fantastic day!


Elodie


samedi 17 février 2018

So Sweet - Cocoa Vanilla Studio


Bonjour!

C'est à mon tour de partager une nouvelle page sur le blog de Cocoa Vanilla Studio aujourd'hui! Je me suis amusée avec la superbe collection More than Words ainsi qu'avec une photo de ma fille aînée âgée de quelques mois en compagnie de son papa et de notre chienne. Voici ma page!

Hi there!

It's my turn to share a new project on the Cocoa Vanilla Studio blog today! I played again with the gorgeous More than Words collection and a sweet photo of my oldest daughter, back when she was a few months old, with her dad and our Frenchie. Here is my page!


Je vous ai déjà dit que j'adore les couleurs douces de cette collection?! Il fallait absolument que j'utilise le beau papier Radiant pour le fond. J'aime ces bandes pastels et cet effet peinture. Tout simplement magnifique!

Did I mention that I'm in love with the More than Words soft colors?! I just had to use the beautiful Radiant paper for my background. I simply adore those pastel stripes and that paint effect. So pretty!


Pour garder l'attention sur ma jolie photo, je suis partie sur un design simple et j'ai décidé de faire un cluster en bas de la page. J'ai opté pour une photo en noir et blanc pour la faire ressortir sur le fond coloré.

To keep the focus on my precious pic, I went with a simple design and decided to make a cluster at the bottom of the page. I also used a black and white filter on my photo to make it pop against the colorful background.


J'ai commencé par placer un cadre de l'ephemera pack dans le coin inférieur gauche de la page. J'ai matté la photo avec une feuille du paper pad et je l'ai collée sur le cadre à l'aide de carrés de mousse 3D pour apporter du relief.

I started by placing a frame from the ephemera pack on the bottom left-hand corner of the page. I matted the photo with a paper from the 6x6 pad and adhered it on the frame using foam squares for dimension.


Pour le titre, j'ai utilisé des mots en chipboard que j'ai orné d'un badge. J'ai ensuite ajouté d'autres beaux embellissements de la collection autour de ma photo: des découpes en calque, des die-cuts et un onglet autocollant. J'ai apporté la touche finale à ma page avec quelques enamel dots et des cœurs en chipboard.

For the title, I used some of the awesome chipboard words that I topped with a cute flair button. I then added more beautiful More than Words embellies to my photo cluster: vellum accents, die cuts and a tab sticker from the accesory sticker sheet. I put the final touch to my sweet page with a couple of enamel dots and chipboard hearts.


Je n'avais pas envie d'ajouter quoi que ce soit d'autre à ma page. J'aime sa simplicité et la manière dont les jolies couleurs de cette collection mettent en valeur la photo!

I didn't feel like adding anything else to my page. I like its simplicity and how the pretty More than Words colors make my photo shine!


J'aime tout de cette belle collection et j'espère que ma page vous donnera envie de l'utiliser! Merci de vous être arrêté par ici! Je vous souhaite une belle journée et un très bon weekend!

I love everything about this beautiful collection and I hope my layout inspires you to have fun with it! Thanks so much for visiting my blog today! Wishing you a lovely day and a great weekend!


Elodie


jeudi 15 février 2018

Cold - Scraplift Sunday


Bonjour à tous!

J'espère que votre semaine se passe bien! J'ai une toute nouvelle page à partager aujourd'hui réalisée pour un des Scraplift Sunday challenges de février de Paper Issues. J'ai lifté la superbe page de Becky Stidham en mélangeant les collections Snow and Cocoa, Heart Day et Chasing Dreams de Crate Paper. Voici ma page!

Hi friends!

I hope you're having a great week! I'm popping in today to share a brand new page with you. I played along with Paper Issues' Scraplift Sunday and lifted an awesome layout by Becky Stidham. For my page, I used supplies from the Snow and Cocoa, Heart Day and Chasing Dreams collections by Crate Paper as well as a cute photo of my Frenchie. Here is my take!


Tout d'abord, j'ai superposé des feuilles du paper pad Snow and Cocoa de chaque côté de la page. J'ai ensuite collé la photo sur le côté gauche avec de la mousse 3D pour la faire ressortir. J'ai opté pour une photo en format paysage à la place de deux petites photos comme sur la page de Becky. J'ai quand même mis ma bouledogue à l'honneur en clin d’œil aux jolies photos qu'elle a utilisées!

First, I made layers with papers from the Snow and Cocoa 6x6 pad on each side of the page. I adhered the photo on the left-hand side with foam squares to make it pop. I went with a landscape photo instead of two square pics. But I just had to use a photo of my Frenchie to echo Becky's sweet doggy pics!


Je me suis ensuite affairée à ajouter des embellissements autour de ma photo: un carte Snow and Cocoa que j'ai glissée sous la photo, des découpes coeurs de la collection Heart Day, des stickers Chasing Dreams, un flocon perforé dans du cardstock blanc et un autre flocon doré de la collection Snow and Cocoa. Pour le titre, j'ai utilisé une découpe en bois Snow and Cocoa que j'ai placée sous la photo.

I completed my photo cluster by adding pretty embellies around the pic: a Snow and Cocoa ephemera piece that I tucked under the photo, paper hearts from the Heart Day line, Chasing Dreams stickers, a punched snowflake and a snowflake sticker from the Snow and Cocoa collection. For the title, I used a cute Snow and Cocoa wood veneer word that I placed under the photo.


Je suis ensuite passée à l'autre côté en superposant des embellissements de la collection Heart Day sur un tag que j'ai fait avec une carte de l'ephemera pack Snow and Cocoa. J'ai ajouté des mots autocollants Chasing Dreams, un autre flocon Snow and Cocoa ainsi qu'un morceau de twine comme sur la page de Becky. Enfin,j'ai terminé ma page avec quelques gouttes d'encre noire.

Next, I moved on to the right-hand side of the page and layered Heart Day embellies on a tag that I made with a Snow and Cocoa ephemera piece. I added a couple of Chasing Dreams stickers, another Snow and Cocoa snowflake sticker as well as a bit of twine just like on Becky's layout. I put the final touch to my page with droplets of black ink.


Et voici la belle page de Becky!
Here is Becky's beautiful page!


J'ai adoré lifté cette page! Si elle vous inspire également, rendez-vous dans le groupe Facebook de Paper Issues pour partager vos lifts! De nombreux autres challenges vous y attendent! Merci de votre visite et à très vite!

I had so much fun lifting this layout! If you want to play along too, head over to the Paper Issues Friends and Fans Facebook group to share your lifts and check out all the fun February challenges! Thank you for stopping by! Wishing you an awesome day!


Elodie


lundi 12 février 2018

Magical Moments - Pink Paislee


Bonjour!

J'espère que vous avez passez un excellent weekend! Je commence cette nouvelle semaine avec une page que vous pouvez retrouver aujourd'hui sur le blog de Pink Paislee. Je suis très heureuse de rejoindre cette fabuleuse équipe et de partager mon tout premier projet avec vous! J'adore créer des scènes sur mes pages. Pour ce premier post, j'ai donc décidé de faire un soleil sur ma page avec la belle collection Turn the Page ainsi qu'une grande photo de moi et des filles prise lors d'un voyage en Espagne il y a deux ans. La voici!


Hi there!

I hope you had a great weekend! I'm starting this new week with a layout that is up today on the Pink Paislee blog. I'm so excited to be joining this fabulous team and to share my first project with you! I love creating scenes on my layouts. So, for this spotlight post, I decided to make a big sun on my page using the beautiful Turn the Page collection as well as a large photo of me and my girls snapped in Spain a couple of years ago. Here is my page!


Pour pouvoir utiliser des couleurs vives sur ma page, j'ai opté pour une photo en noir et blanc et j'ai choisi un papier uni et clair pour le fond.

To be able to use bright colors on my layout, I went with black and white for the photo and I picked paper #16, with its soft mint green color, for the background.


Tout d'abord, j'ai placé deux bandes découpées dans les papiers #12 et #24 en bas de la page. J'ai ensuite découpé la photo de manière à obtenir un demi-cercle et je l'ai collée avec de la mousse 3D pour la faire ressortir.

I started by placing two colorful strips from papers #12 and #24 at the bottom of the page. Then I cut the photo so as to get a half circle and I adhered it with foam tape to make it pop.


Je me suis ensuite affairée à faire les rayons de soleil à l'aide de washi stickers de la collection. J'ai ajouté encore plus de couleurs à ma page avec des découpes que j'ai placées sur les bords de la photo. J'ai également utilisé des journaling spots sur lesquels j'ai tamponné la date et ajouté le lieu avec des lettres autocollantes du sticker book.

Next, I moved on to making my sunbeams using colorful Turn the Page washi stickers. I added more pretty colors to my page with die cuts that I placed on the edge of the photo. I also included a couple of journaling spots on which I stamped the date and added the location using alpha stickers from the Turn the Page sticker book.


Pour le titre, j'ai utilisé un die-cut que j'ai placé en bas de la photo et que j'ai orné de cœurs autocollants du sticker book. J'ai terminé en ajoutant d'autres autocollants de la collection sur la photo.

For the title, I used another die cut that I placed at the bottom of the pic and that I adorned with cute heart stickers from the sticker book. I added a couple of puffy and clear stickers on my photo cluster and my scene was complete!


J'adore la façon dont la photo ressort avec les couleurs vives de cette collection! J'espère que cette page vous donnera envie de créer des scènes colorées sur vos projets! Merci beaucoup d'être passé par ici et à bientôt!

I love how the black and white photo stands out against the pretty Turn the Page colors! I hope this layout inspires you to create colorful scenes on your projects using Pink Paislee goodies! Thank you so much for joining me today! Have a fantastic day!


Elodie


vendredi 9 février 2018

Love is in the Air - Paper Issues


Bonjour à tous!

J'espère que vous avez passé une bonne semaine! Je suis de retour aujourd'hui avec une nouvelle page que vous pouvez retrouver aujourd'hui sur le blog de Paper Issues. Avez-vous vu tous les nouveaux challenges de février dans le groupe Facebook Paper Issues Friends and Fans? Je me suis inspirée du Love is in the Air challenge pour lequel il faut créer des projets en rapport avec l'amour et la Saint Valentin. J'ai utilisé la jolie collection Sweet Nothings de Fancy Pants ainsi qu'une photo de moi et de mon chéri prise aux chutes du Niagara il y a quelques années. Voici ma page!

Hi everyone!

I hope you had a wondeful week! I'm back with a new page that is up today on the Paper Issues blog. Have you seen all the February challenges in the Paper Issues Friends and Fans Facebook group? I played along with the Love is in the Air challenge that is all about Valentine's Day projects and love. I used the super pretty Sweet Nothings collection by Fancy Pants as well as a photo of me and my sweetheart snapped at the Niagara Falls a few years ago. Here is my layout!


J'adore les papiers à motif et j'en ai utilisé beaucoup sur cette page! J'a choisi le papier à rayures Love is in the Air pour le fond et j'ai placé une bande de la feuille Love Garden au centre de la page. J'ai ensuite superposé des feuilles du paper pad Sweet Nothings et la photo que j'ai collée avec de la mousse 3D pour la faire ressortir.

I'm a big fan of patterned papers and I used a lot of them on this page! I picked the bold Love is in the Air paper for my background and placed a strip from the Love Garden sheet in the center of the page. Next, I made pretty layers using papers from the Sweet Nothings 6x6 pad and I topped them with the matted pic. I adhered it with foam squares to make it pop.


J'ai ajouté de jolis embellissements de la collection sur les papiers et sur la photo: des tags en forme de lettres et de cœurs, des découpes et des puffy stickers. J'ai également décoré le haut et le bas de la page avec des tags hexagonaux que j'ai ornés de die-cuts et d'un autre puffy sticker pour le titre.

I then moved on to the embellishing part and added pretty Sweet Nothings embellies on my layers and on the photo: big letters and hearts from the tag pack as well as die cuts and puffy stickers. I adorned the top and the bottom of the page with cute hexagonal tags that I topped with die cuts and a puffy sticker for the title.


Enfin j'ai ajouté une touche scintillante à ma page avec un nœud et des enamel dots pailletés ainsi que des bandes de washi tape doré, de la collection Little by Little de Shimelle, que j'ai placées sous les couches de papiers.

Last but not least, I added a bit of shine to my layout with a glittery bow and enamel dots from my stash as well as gold washi tape, from the Shimelle Little by Little line, that I tucked under the layers.


J'aime beaucoup les couleurs vives de cette collection de Saint Valentin! Vous pouvez trouvez quelques papiers et embellissements Sweet Nothings, et bien d'autres jolies choses encore, dans la boutique Paper Issues. Et retrouvez le Love is in the Air challenge, ainsi que tous les challenges de février, dans le groupe Facebook de Paper Issues! Merci de vous être joint à moi aujourd'hui! Bonne journée à vous!

I love the bold colors of this Valentine's Day collection! You can find some Fancy Pants Sweet Nothings goodies, along with more pretty supplies, in the Paper Issues store. And join us in the Paper Issues Facebook group to share your Love is in the Air projetcs and play along with more awesome challenges! Thank you for joining me today! Wishing you a lovely day!


Elodie


samedi 3 février 2018

Love Cards - Cocoa Vanilla Studio


Bonjour!

Vous pouvez me retrouver aujourd'hui sur le blog de Cocoa Vanilla Studio avec un tout nouveau projet réalisé avec la superbe collection More than Words. Le 14 février n'étant pas très loin, j'ai décidé de faire des cartes de Saint Valentin. La collection More than Words s'y prête parfaitement avec ses couleurs douces et ses motifs romantiques. Voici mes cartes!

Hi there!

I'm on the Cocoa Vanilla Studio blog today with a new project using the gorgeous More than Words collection. With Valentine's day just around the corner, I decided to make a set of love cards. The More than Words line is just perfect for Valentine's Day projects with its soft colors and romantic patterns! Here are my cards!


Pour commencer, j'ai fait la base de mes cartes en pliant des feuilles du paper pad en deux. Simple et pratique!

For the base of my cards, I folded papers from the awesome 6x6 pad in half. So handy and easy!


J'ai ajouté un rectangle de papier à motif sur chaque base et je suis passée à la partie embellissement. Pour le titre de mes cartes, j'ai utilisé un mot en chipboard, des badges et quelques mots autocollants. Rien de mieux que des pièces en chipboard et des badges pour ajouter du relief à un projet!

I topped the base with rectangles that I cut in more 6x6 papers and I moved on to the emebllishing part. For the sentiments, I used one of the lovely chipboard words, cute flair buttons and a couple of word stickers from the accessory sticker sheet. The chipboard titles and the flair buttons are really great to add dimension to any projects!


Cette collection regorge d'embellissements tous plus beaux les uns que les autres et j'avais l'embarras du choix pour décorer mes cartes! J'ai utilisé quelques autocollants en chipboard, des die-cuts ainsi que des découpes en calque. J'adore la touche délicate qu'apportent ces pièces en calque!

More than Words is packed with gorgeous embellies and I had a lot to choose from to adorn the top of my cards! Here, I used a couple of chipboard stickers, die cuts from the ephemera pack and pretty vellum accents. I love the soft and delicate touch these vellum pieces bring!


Pour apporter plus de volume à mes cartes, j'ai collé quelques éléments avec des carrés de mousse 3D et j'ai plié légèrement les papillons pour les faire ressortir. Enfin, j'ai terminé en ajoutant quelques enamel shapes ici et là.

To give even more dimension to my cards, I adhered some items with foam squares and I folded up the butterflies to make them pop. I finished my cards by adding cute enamel shapes here and there!


Je fonds pour ces couleurs pastel et ces motifs! J'espère que ces cartes vous inspireront et vous donneront envie de mettre la main sur cette belle collection! Merci de votre visite! Je vous souhaite une bonne journée et un excellent weekend!

The More than Words patterns and pastel colors have me swooning! It's all so beautiful! I hope these cards inspire you to get your hands on this stunning collection! Thanks so much for visiting my blog today! Wishing you a lovely day and a great weekend!


Elodie


vendredi 2 février 2018

Pink Paislee Design Team


Bonjour à tous!

La nouvelle a déjà été partagée sur les réseaux sociaux mais je ne l'avais pas encore annoncée sur mon blog. J'ai la joie et la chance de rejoindre l'incroyable Design Team de Pink Paislee! J'ai hâte de créer aux côtés de ces scrappeuses talentueuses et de partager mes projets pour Pink Paislee avec vous! C'est parti pour de nouvelles aventures!

Hi friends!

The announcement has already been made on social media but I didn't get to share it on my blog. I'm so happy and lucky to join the amazing Pink Paislee Design Team! I'm super excited to craft alongside these talented ladies and to share my Pink Paislee projects with you! Here's to new adventures!


Pink Paislee 2018 Design Team:


Merci de vous être arrêté par ici et à très vite!
Thank you for stopping by! See you again soon!


Elodie


jeudi 1 février 2018

Paper Issues Design Team


Bonjour!

C'est aujourd'hui que Paper Issues dévoile sa nouvelle Design Team, avec de nouveaux visages et d'autres que vous connaissez déjà! Je suis tellement contente de faire partie de cette fabuleuse équipe! Rendez-vous sur le blog de Paper Issues pour faire connaissance avec toute l'équipe et rejoignez-nous dans le groupe Facebook Paper Issues Friends and Fans pour découvrir les challenges de février!

Hi!

The new Paper Issues Design Team is being announced today on the PI blog, with some familiar faces and some new ones too! I am so thrilled to be part of this fantastic team! Hop over to the Paper Issues blog to meet all the PI girls and join us in the Paper Issues Friends and Fans Facebook group to play along with the February challenges!


Welcome to the Paper Issues Design Team:


Paper Issues Returning Design Team Members:


Merci beaucoup d'être passé par ici et à bientot!
Thank you so much for joining me today! Have a great day!


Elodie